Parent Reports - Creating and Editing Report Templates
 Updated
- What is a Parent Report Template?
- Adding a new parent report template
- Editing parent report templates
- Customising a school template
- Placeholders
Parent reports, in Insight, are almost entirely customisable, to suit your needs.
Insight already provides a gallery of different templates, for you to choose from, and these may be used 'out of the box'.
Admin users can customise Parent Report templates, which may then be used to generate pupil reports in bulk.
This guide describes how to create a template and get Insight to automatically populate your reports with comments, assessments and other data.
The following short video walks through the main points using a practical example.
What is a Parent Report Template?
The design of each parent report is defined by a template - a simple Word file which tells Insight what information you want displayed on the report and where you want it located. Because it's a Word document, you have total control over the design, right down to colour scheme, background, images, tables, and logos.
You can set up as many templates as you need for teachers to use when writing reports for parents. You might need different ones for each year group, or a set of termly parent reports and a different set of statutory assessment reports.
We suggest reviewing the Insight provided templates to see if any meet your requirements. If not, you can start from scratch or download a built-in template and amend it.
Templates may be managed at school level or also at Trust level, where applicable. The following applies to both school and Trust level template management.
Preset Templates
Insight provides some built-in templates. These could be used with no, or minimal, changes or as a start point for your own amended version.
Insight offers templates for end of year reports, statutory assessment reports (including EYFS, Phonics, KS1, MTC and KS2), termly reports including Objectives formative assessments and attendance focussed reports (including general attendance parent reports and an attendance concern letter).
We'll describe how to add a built-in template first.
Adding a new parent report template
To get started, make sure you're on the Admin > Parent Report Templates page.
If you're a Trust admin, you may want to create templates to share among all schools in the Trust. This works in the same way as creating a single school template. Just ensure you begin from the Trust admin page.
If you have no existing templates, the page will highlight Add New Template automatically and display all the Insight provided templates as a gallery to browse.
The templates in the gallery are only available to create pupil reports from, once added to your school or Trust. This ensures your template collection is focussed, and only includes the templates you choose.
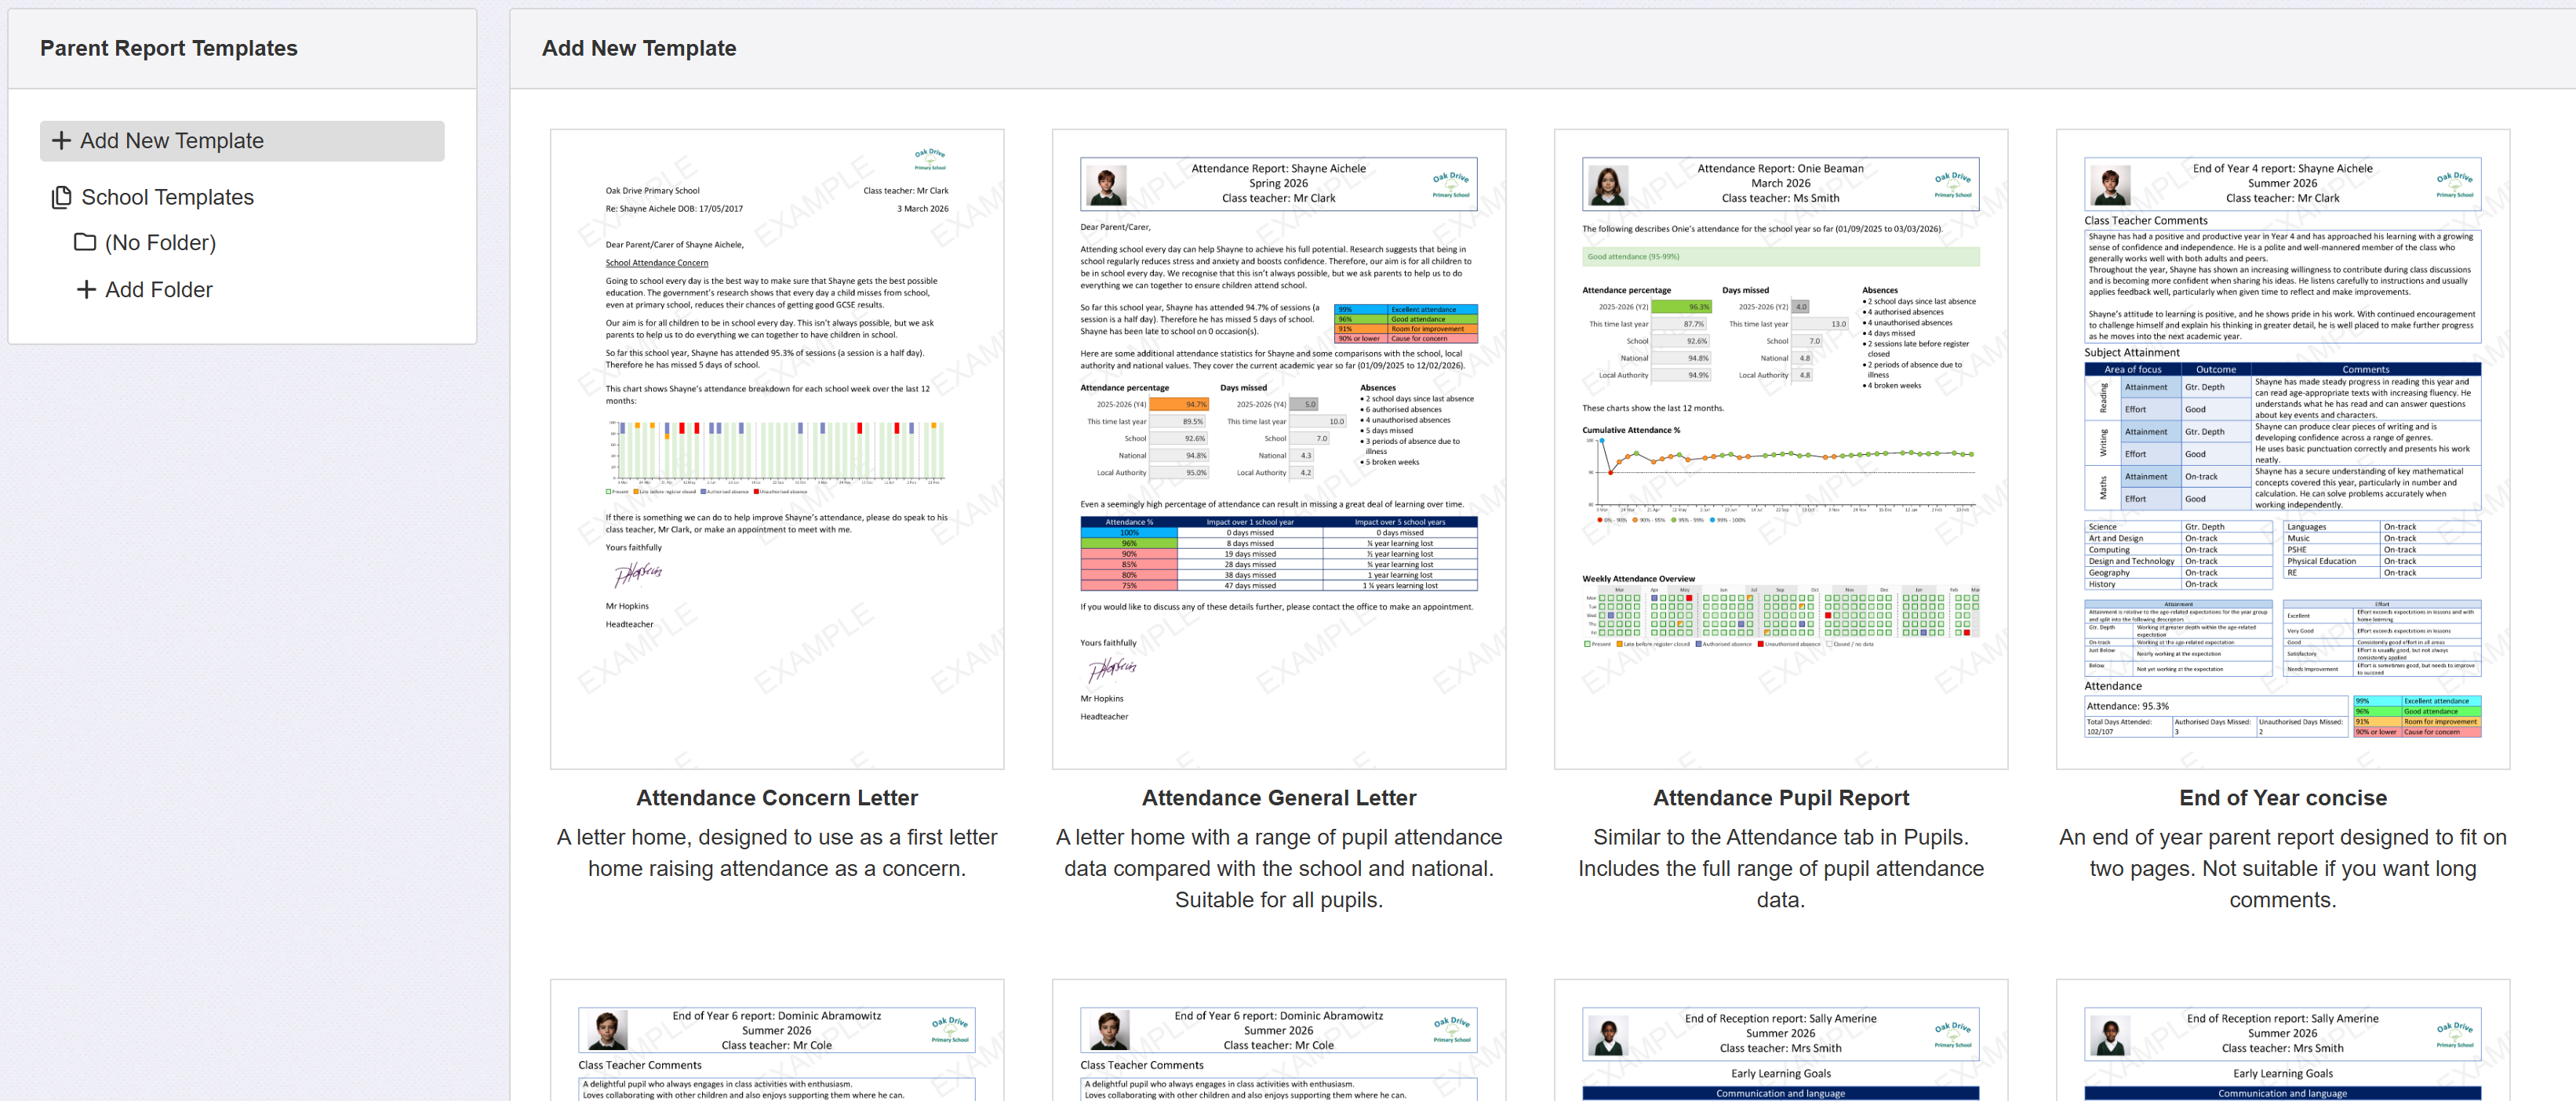
If you want to have a closer look at any of the available templates, just click it to see a preview.
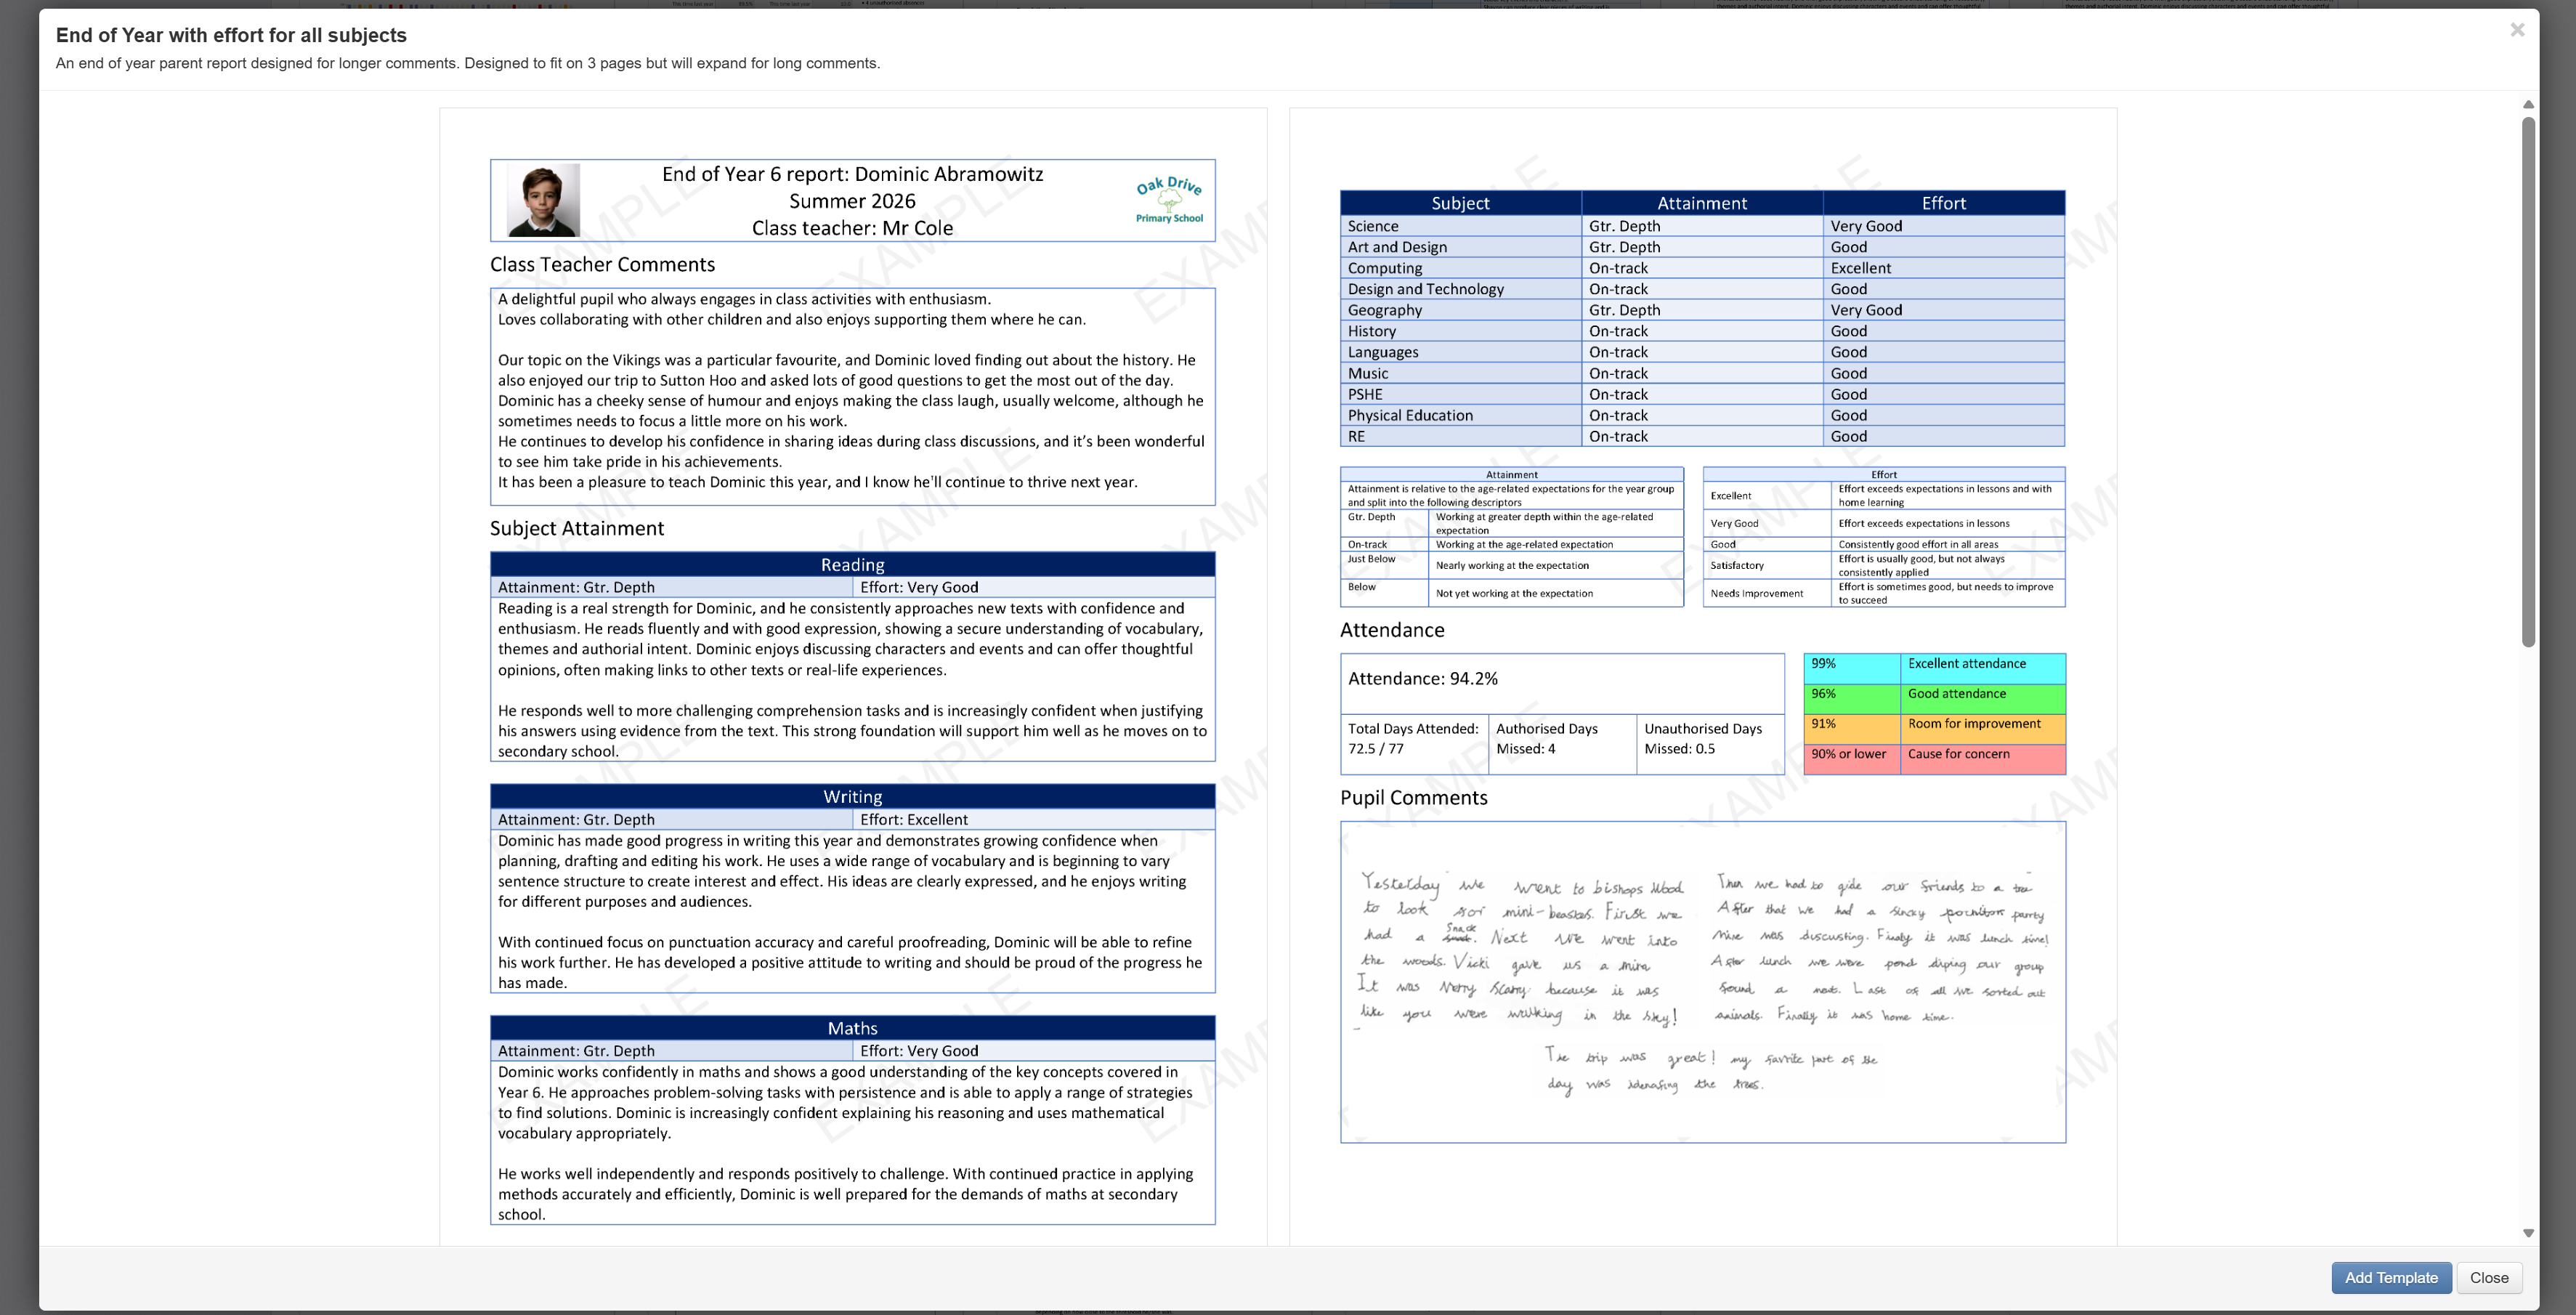
When you've chosen the template you want to add, click Add Template from the preview.

You'll be asked for a name. This allows you to choose a name that suits your usage, rather than use the default name.
If you have any template folders set up, you'll also be able to choose one to add the template to. Then click Add Template to add it to your own collection.
You can also choose to add the template with Draft or Published status.
Draft templates are not available for people to create pupils reports. This ensures you are able to make any required changes and validate them before making the template available outside of the Admin Templates page.
Published templates are available for non-admin users to create pupil reports.
If you add a template as draft you can later publish it by clicking Publish from the template page.

If a template is used to create pupil reports, then subsequently changed back to Draft status, those created reports will still be available to use as normal.
Before adding a custom template, it is advised to browse the Insight ones first. There may be one that has most of the content you want, and it will be easier to tweak this one than to start from scratch.
If you do want to add an entirely custom template, make sure you have your Word file to hand, and click the last option for Custom Template. Don't worry that it may be missing required edits at this stage. You'll be prompted to choose your file and name it.
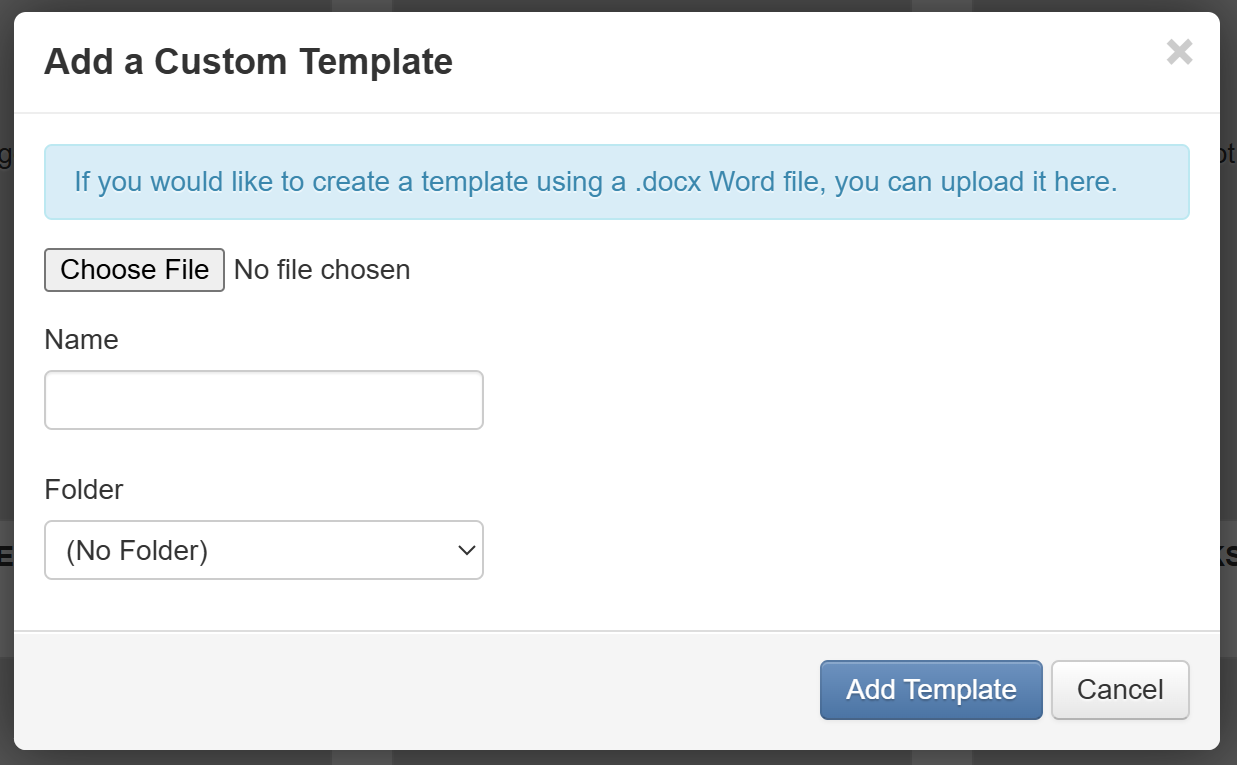
Then click Add Template to upload it. Then it will be shown as a preview.
You may want to create folders to help keep your templates organised. See the Managing Templates guide for help with this.
Editing parent report templates
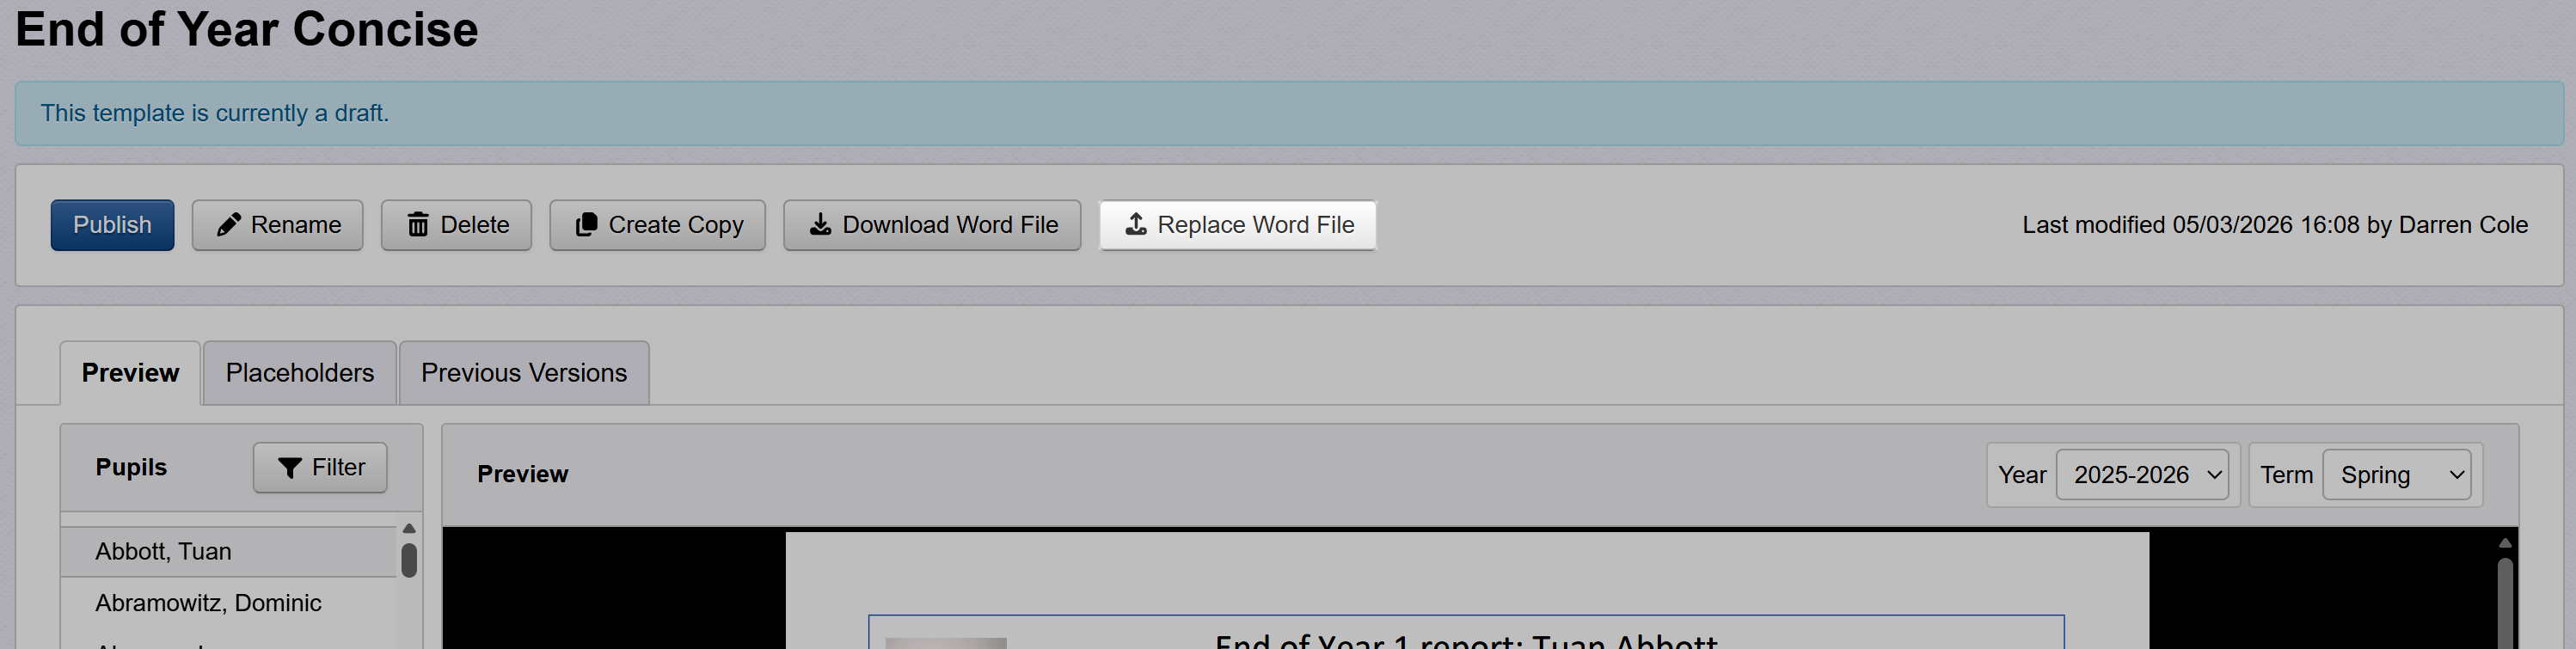
The following applies to any Word template, but we'll use the Insight End of Year Concise template as an example.
Select the template to display its preview.
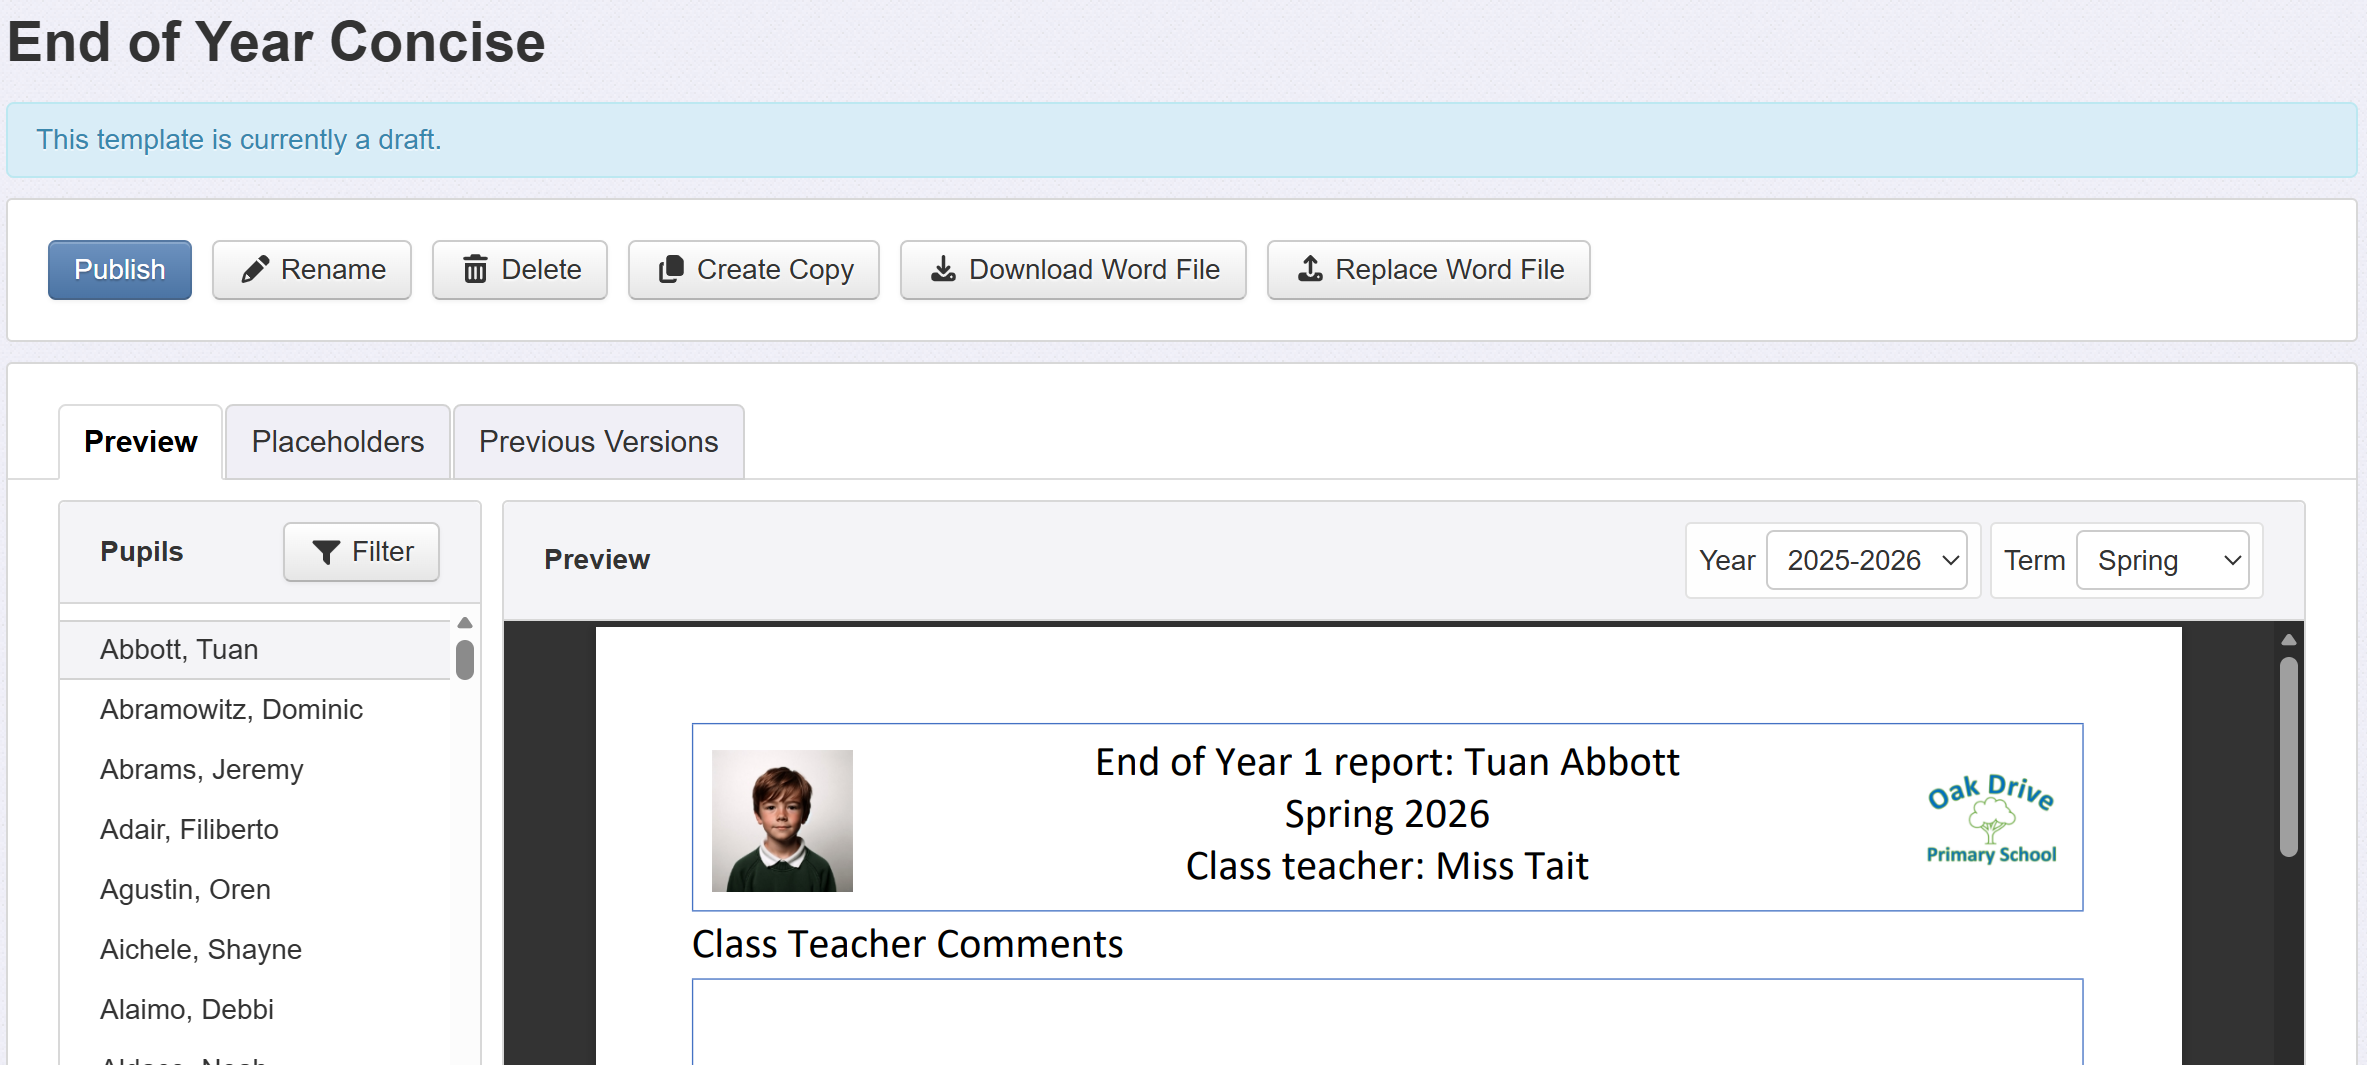
The buttons at the top have various functions.
When you're happy to allow pupil reports to be created using this template, click Publish. You can change your mind afterwards and click Convert to Draft if you need to. Publishing is not set in stone.
You can also Rename your template here or Delete it if it's no longer needed. Deleting a template will not also delete any pupil reports that were created using it. These will continue to exist and may be used as normal.
Create a Copy can be useful if you want to make a report that is very similar to this one.
Depending on the template you're looking at, there might be errors indicated in the Placeholders tab. Placeholders, and how to resolve these errors, are covered in the next section, but this just means that the Insight template included a reference to something which differs to your school setup; a subject name for example. The same is true of any templates added at Trust level; the placeholders need to match all the assessments etc. in the school.
To make changes, you'll need to click Download Word File. This will save a Word file which you should then open, ready to edit. Read on to learn about how the Placeholders work.
Customising a school template
Here, we'll walk through how to use an existing parent report in Word as our start point. If you've downloaded an Insight template, the process is the same, only you'll already have some Placeholders.
Open your report Word file ready to edit.
Make any layout and content changes you need; adding any boxes and headings etc.
Here is a report, as a blank template, similar to ones you may already have in school.
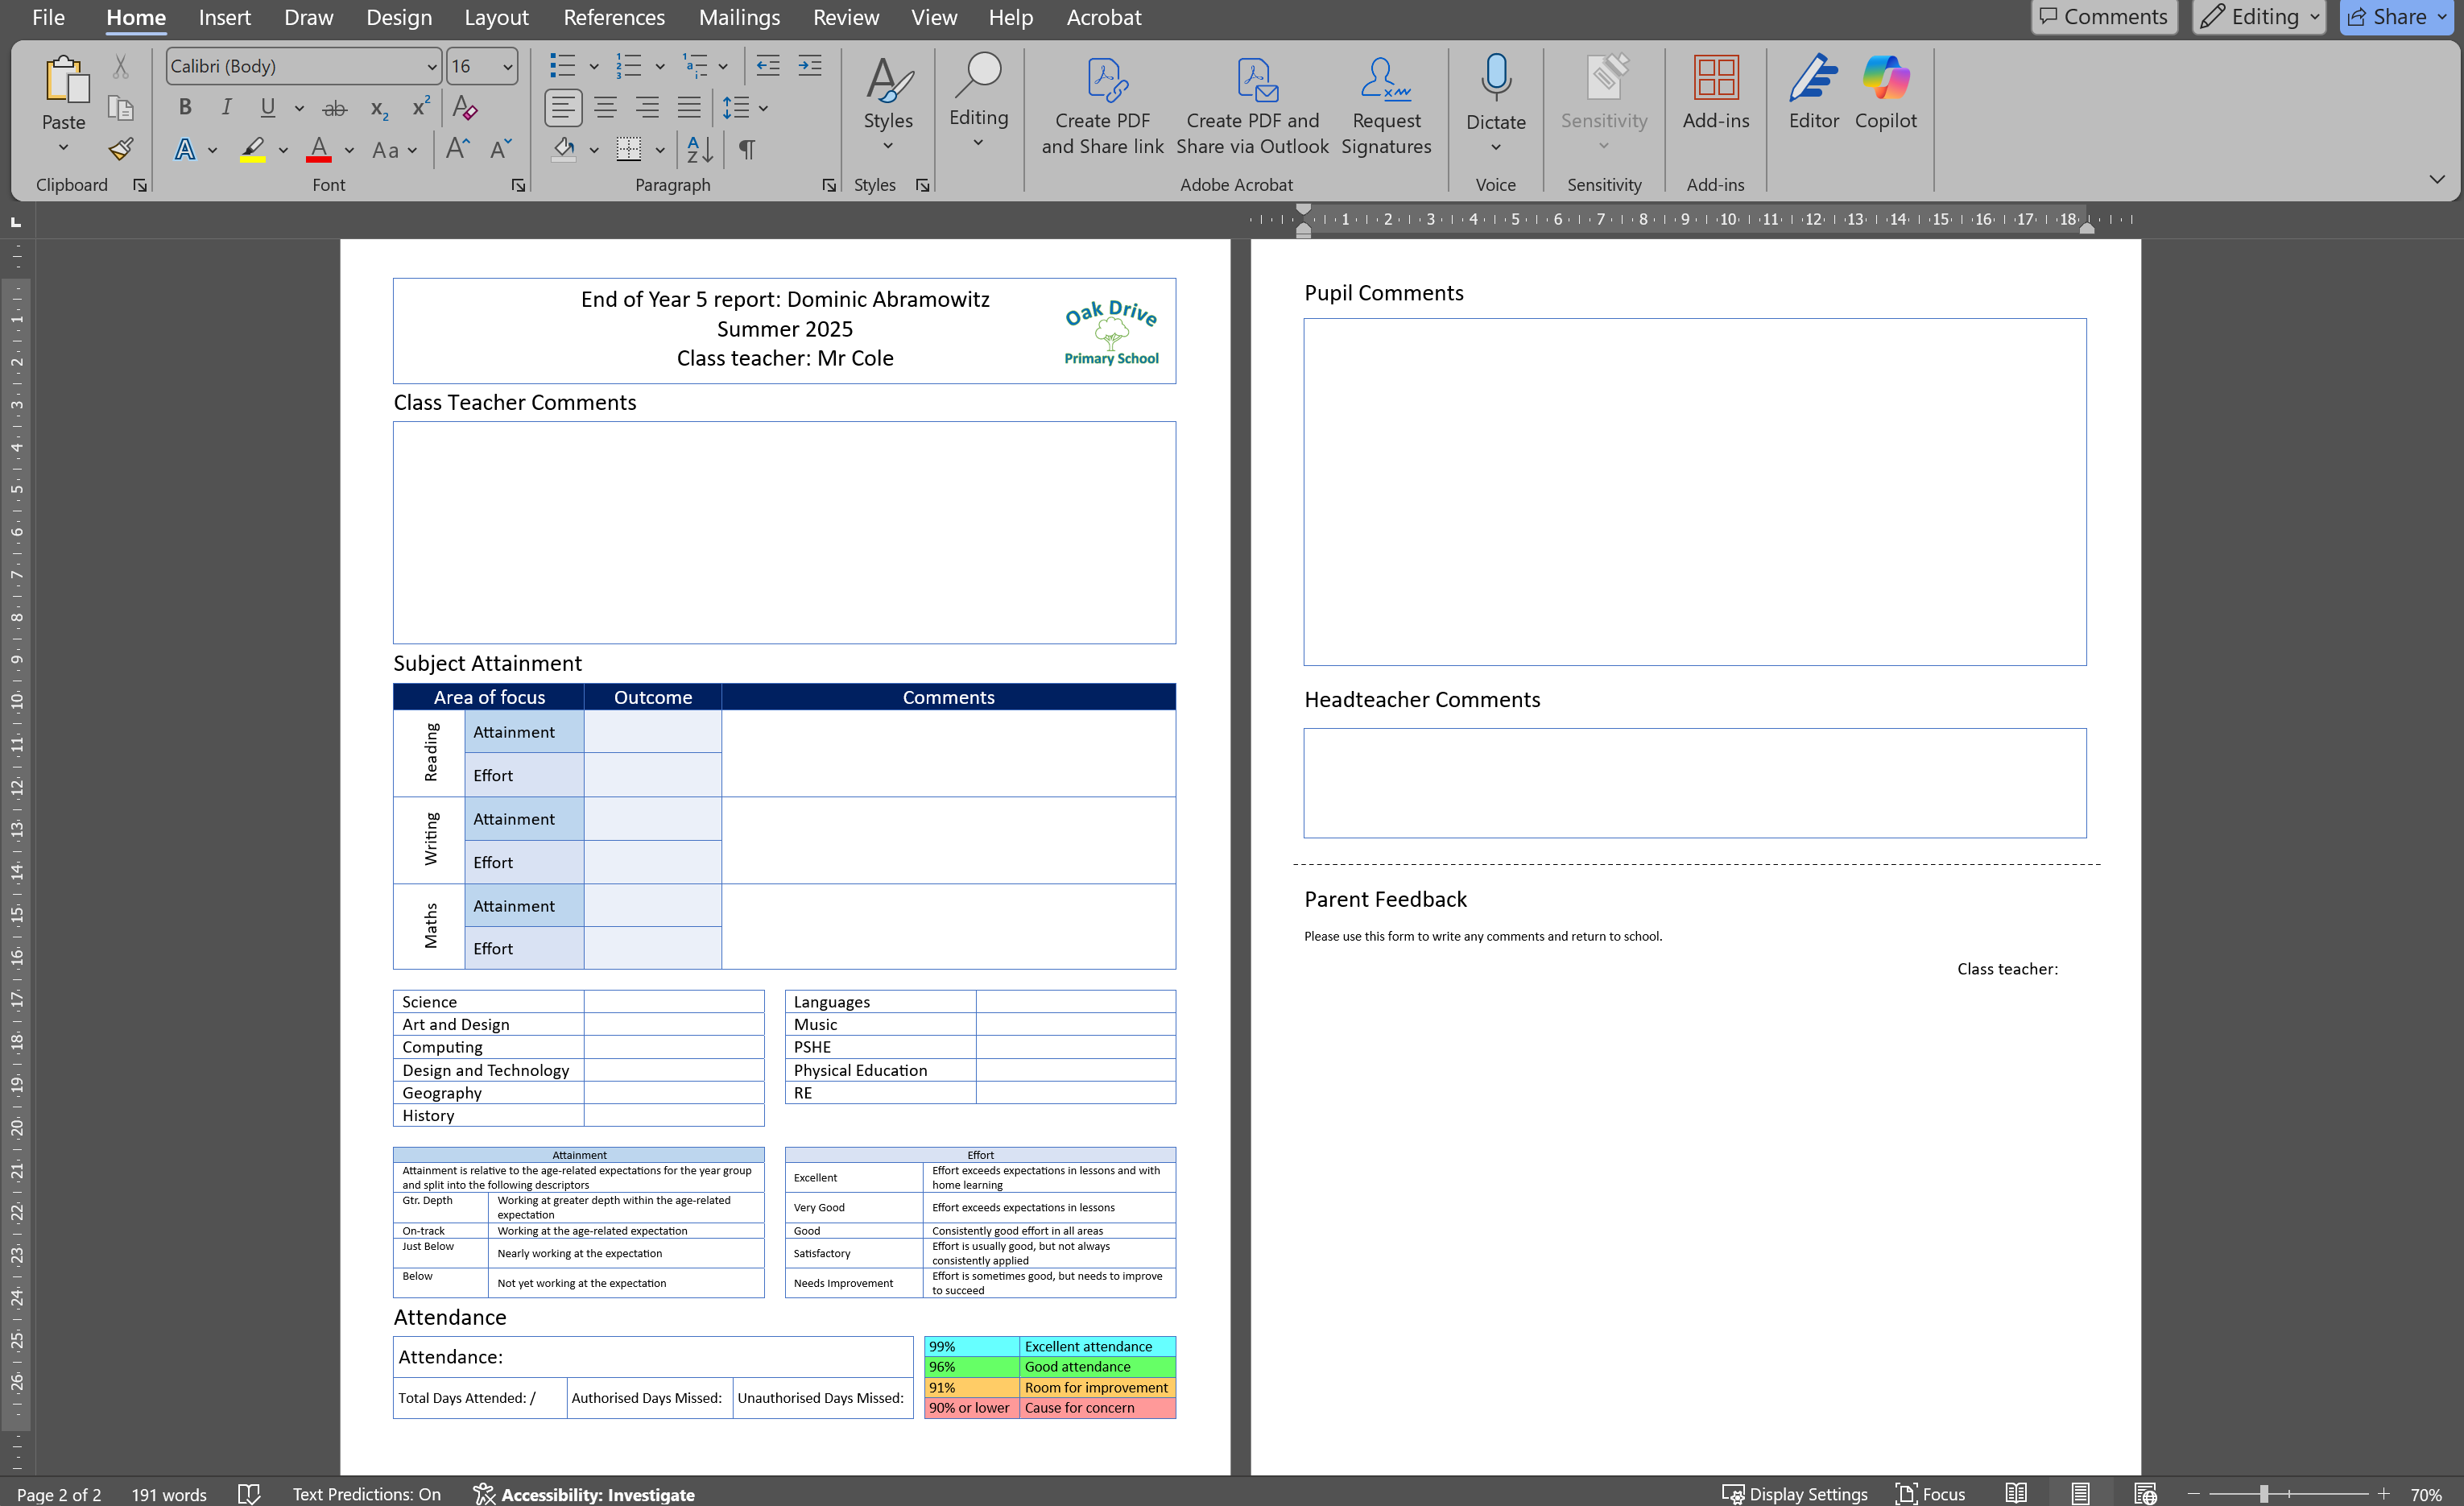
Right now, I’d need to fill this in this for every pupil, typing or pasting comments and data in. Let's see what we can do to get Insight to complete all of that for me.
Firstly, the actual layout and visuals of the report can stay exactly as they are. Insight will be happy with almost any Word file. Insight can even add images, such as a pupil photo and school logo.
So all I need to do is tell Insight what to populate the report with.
Placeholders
All parent reports will consist of a combination of "static" pieces of information, which don't change from report to report (such as the report headings), and "dynamic" pieces of information, which do change from report to report (such as a pupil's name).
In your template, the dynamic content is defined by placeholders. These are the elements contained by curly brackets (also known as braces), for example {First Name} and {Comment: Teacher Comment}. Think of placeholders in your templates as stand-ins for the pieces of information which will be different on each report. They allow you to draw information from Insight and determine where to put it on the page.
There are also a number of image placeholders. Pictures, you can move around and resize in your report and Insight knows to replace them with, say, a pupil photo or a signature image.
To see the available placeholders, click the Placeholders tab on the report page.

If the template already contains any placeholders they'll be listed on the right. All the available placeholders are shown on the left.
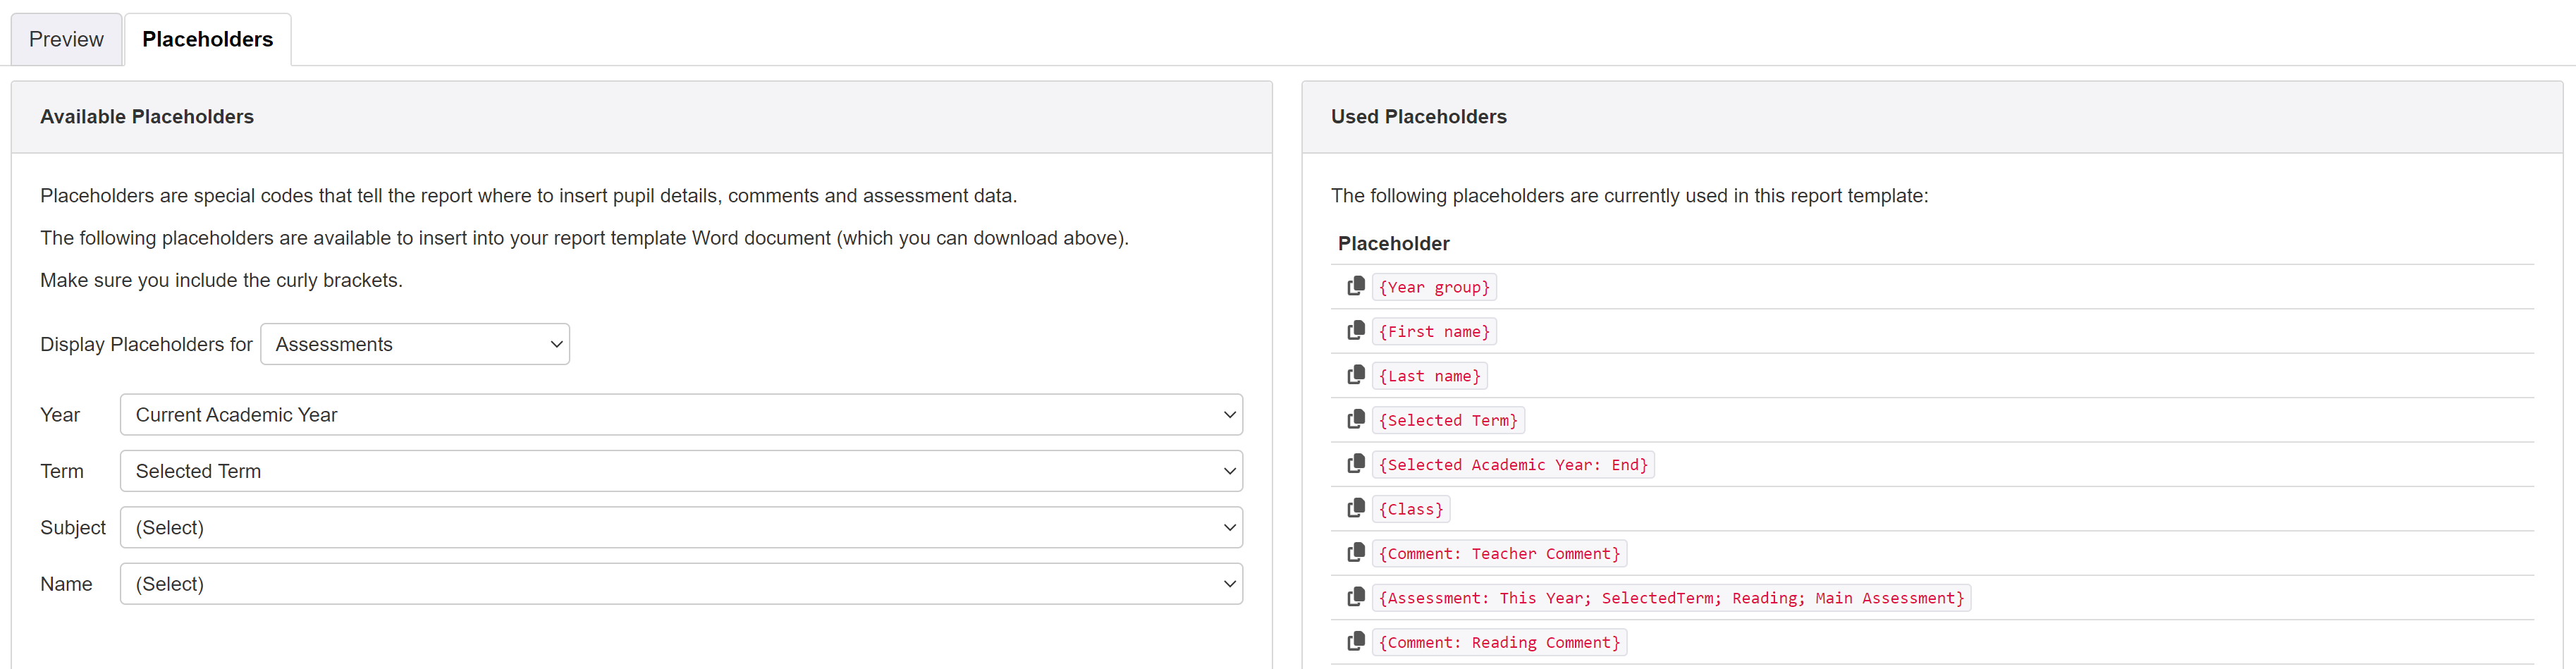
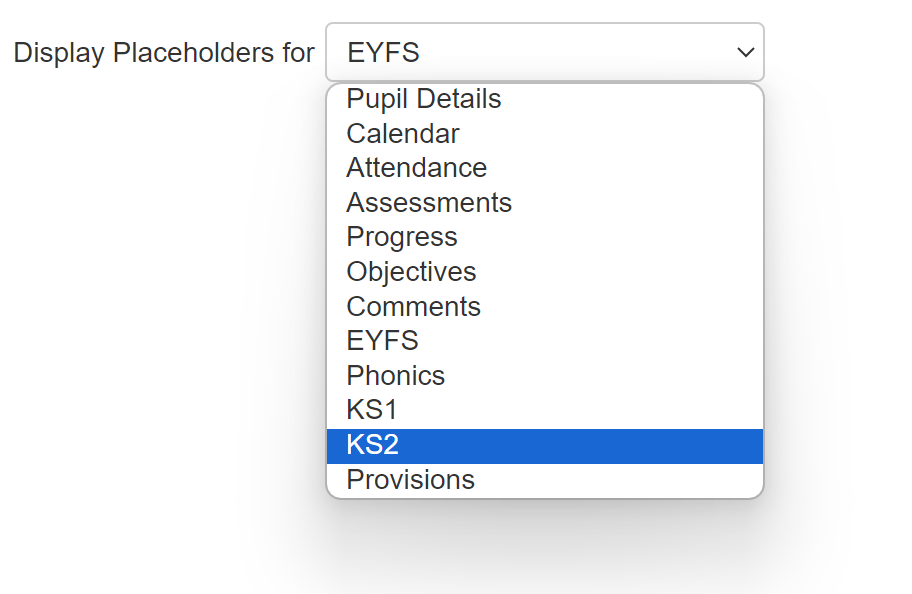
You can copy placeholders from the Parent Report Templates page. Initially, you'll see a list of placeholders relating to Assessments. All assessments used in your school are available. Click on the Display Placeholders for dropdown to see the other options.
You can copy placeholders for Assessments, Attendance, Calendar, the range of statutory assessments, Objectives, Phonics, Progress, Provisions, Pupil, Pupil Groups and School.
Let's make our way through our blank report and add in the necessary placeholders.
Pupil
At the top of the report we have our title section.

Without using placeholders, the template will need changing for each year group and pupil, or if I want to use the same template in another term.
Firstly, we want the placeholder for Year Group, in the Pupil section.

Clicking the small Copy icon allows me to then paste the placeholder into my report.
The name placeholders will replace the pupil name in my template, and the class placeholder will insert the correct class name.
If you'd prefer to have the Class Teacher name, use the placeholder for this. There is also a Class Teacher Image placeholder if you want to include an image associated with the class: maybe a signature or photo of the teacher. See our guide on Adding Class Teacher Names and Signatures or Photos.
Some of the available placeholders allow you to customise the output. These ones have the small pencil icon next to them, indicating that they are editable.
You are able to define the text that Insight will place in the report based on whether the subject is positive or negative.
By default they will output their subject if positive (e.g. "Disadvantaged") and add the word Not if negative (e.g. "Not Disadvantaged").
Click the pencil icon to change both or either of these. Depending on your report you may prefer to just output Yes or No. Or you may prefer to output nothing if the subject is negative; just delete the existing content to achieve this.

Click OK to save your changes. The copyable placeholder will update accordingly and may be copied and pasted into your template.
Click the undo arrow icon to reset an editable placeholder to the default settings.
Here's the title section with all the text placeholders in place.

So now we have a header that will automatically use the appropriate text for each pupil and time of year.
The Pupil section also includes various other placeholders relating to contextual pupil references. For example, pronouns, including possessive and objective, can be useful if you're adding narrative or descriptive text to your reports.
Pupil Photo
Insight can automatically include a pupil thumbnail photo in the report with a pupil photo placeholder.
Pupil Photos should already be syncronised via your MIS. See the MIS sync guide for more on this.
The Pupil Photo placeholder is found in the Pupil section. Click to copy it, as usual. Unlike most placeholders, you will notice that it pastes an image into your Word file rather than just the text. This is to allow you to reposition and size the placeholder to suit your needs.

School
The School section contains a placeholder to insert the school name and one to add a school logo graphic to your report.
While it's easy enough to add your school logo to a template, there is a School Logo placeholder you can use to ensure the logo is consistent in all you reports. It also makes it simple if you ever tweak or change you logo as it will automatically change in every template.
Find the School Logo placeholder in the School section.

The logo may be uploaded via Admin. Follow the blue School Logo hyperlink to be taken straight to the page to do this.
Like the pupil photo placeholder, the school logo placeholder pastes an image in your Word document.
There is also a placeholder for Headteacher name and Image.

The image can be useful, for example, if you want to include a photo of the Headteacher signature.
Calendar
The Calendar section has various date and term related placeholders. The ones that begin with Selected will automatically use the selection when you come to produce the reports. This means you won't have to change the template if you use the same one in another term, or year.
Comments
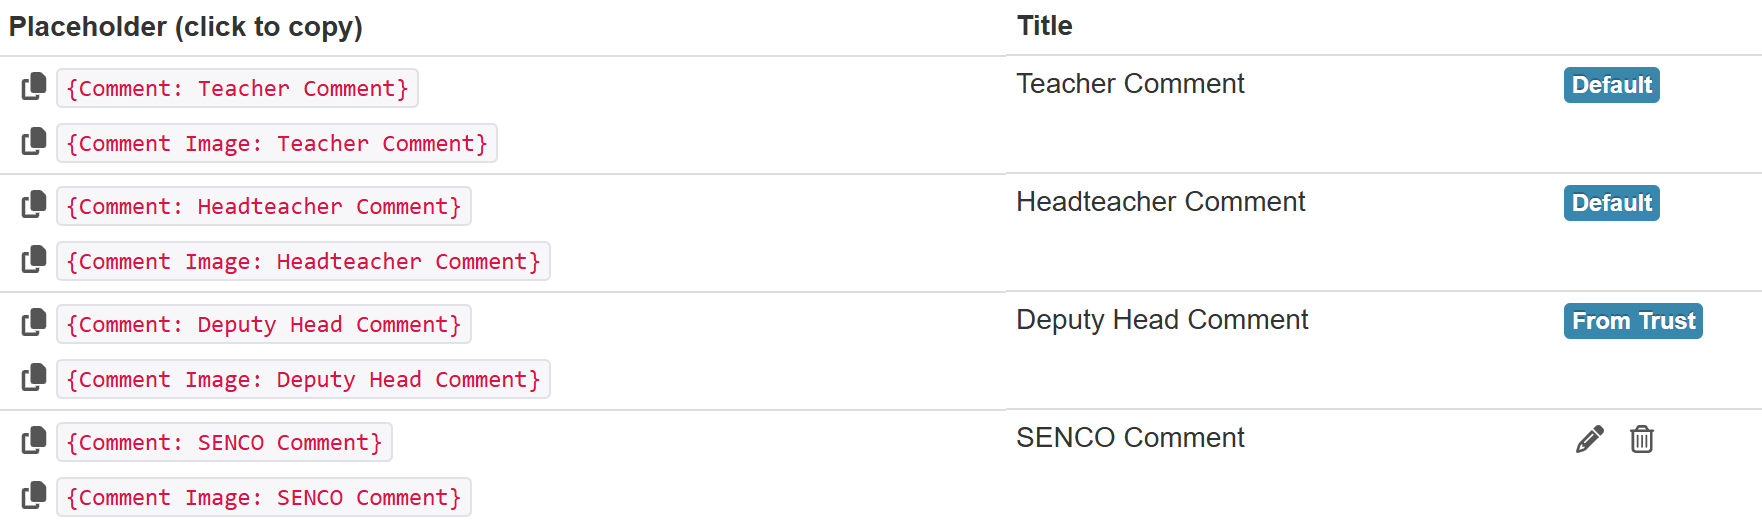
You can define different comment elements for your reports. Many will require a "Teacher Comment", so a placeholder for this exists by default. Click the + Add Another button to create others. For example, you might want to record comments on pupils' achievements in individual subjects, list their targets for the coming year, or provide a field for a headteacher's comment. You don't have to use all comments in all reports, of course.
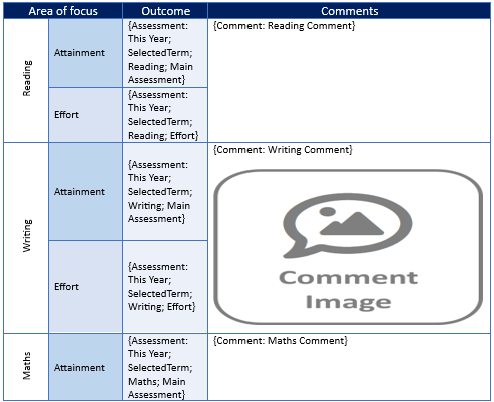
Each comment placeholder title will have a specific one for text, named as Comment: name, and another one which may be used to add images to a report, named as Comment Image: name.

The text placeholder just pastes as text into the report, like most others.
The image placeholder pastes as an image, like the pupil photo and school logo ones. The comment image placeholders will allow people to upload images, such as pictures of pupil work to use as comments or other photos of the pupil you want to use in your reports.
Once added, the comments will be available in the Pupils section > Parent Reports tab for teachers to enter. A separate comment is available for each term if you need it.
For my report, I want comments for Reading, Writing and Maths. As before, just copy and paste the placeholders.
When Insight inserts the text comments, it will use the same font and size you use for the placeholder, so be sure to choose the options you want.
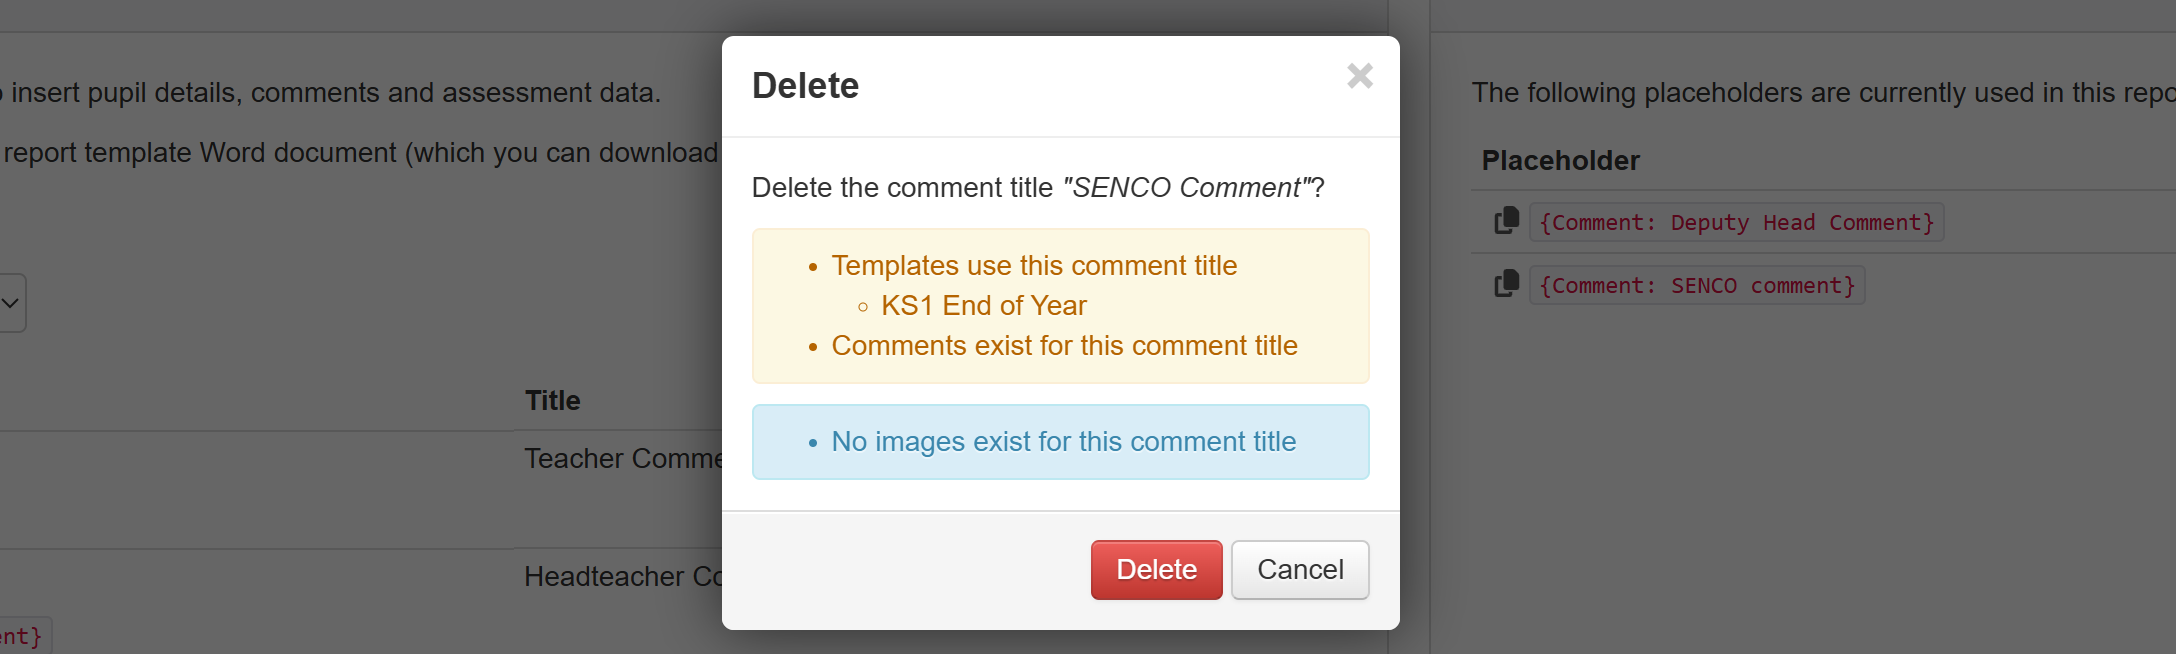
Deleting comment placeholders
Some comment placeholders are default ones, as they feature in the Insight provided templates. As such, these ones may not be deleted.
Similarly, any comment placeholders added at Trust level may not be deleted at school level.
Click the trash icon to delete a comment placeholder.
If you're deleting at school level, a confirmation message will inform you if any existing templates are using that placeholder.
Also, if any comments or images have already been saved for that placeholder.
Deleting a comment placeholder at Trust level will inform you if any Trust added templates use that placeholder, but not any specific usage at school level.
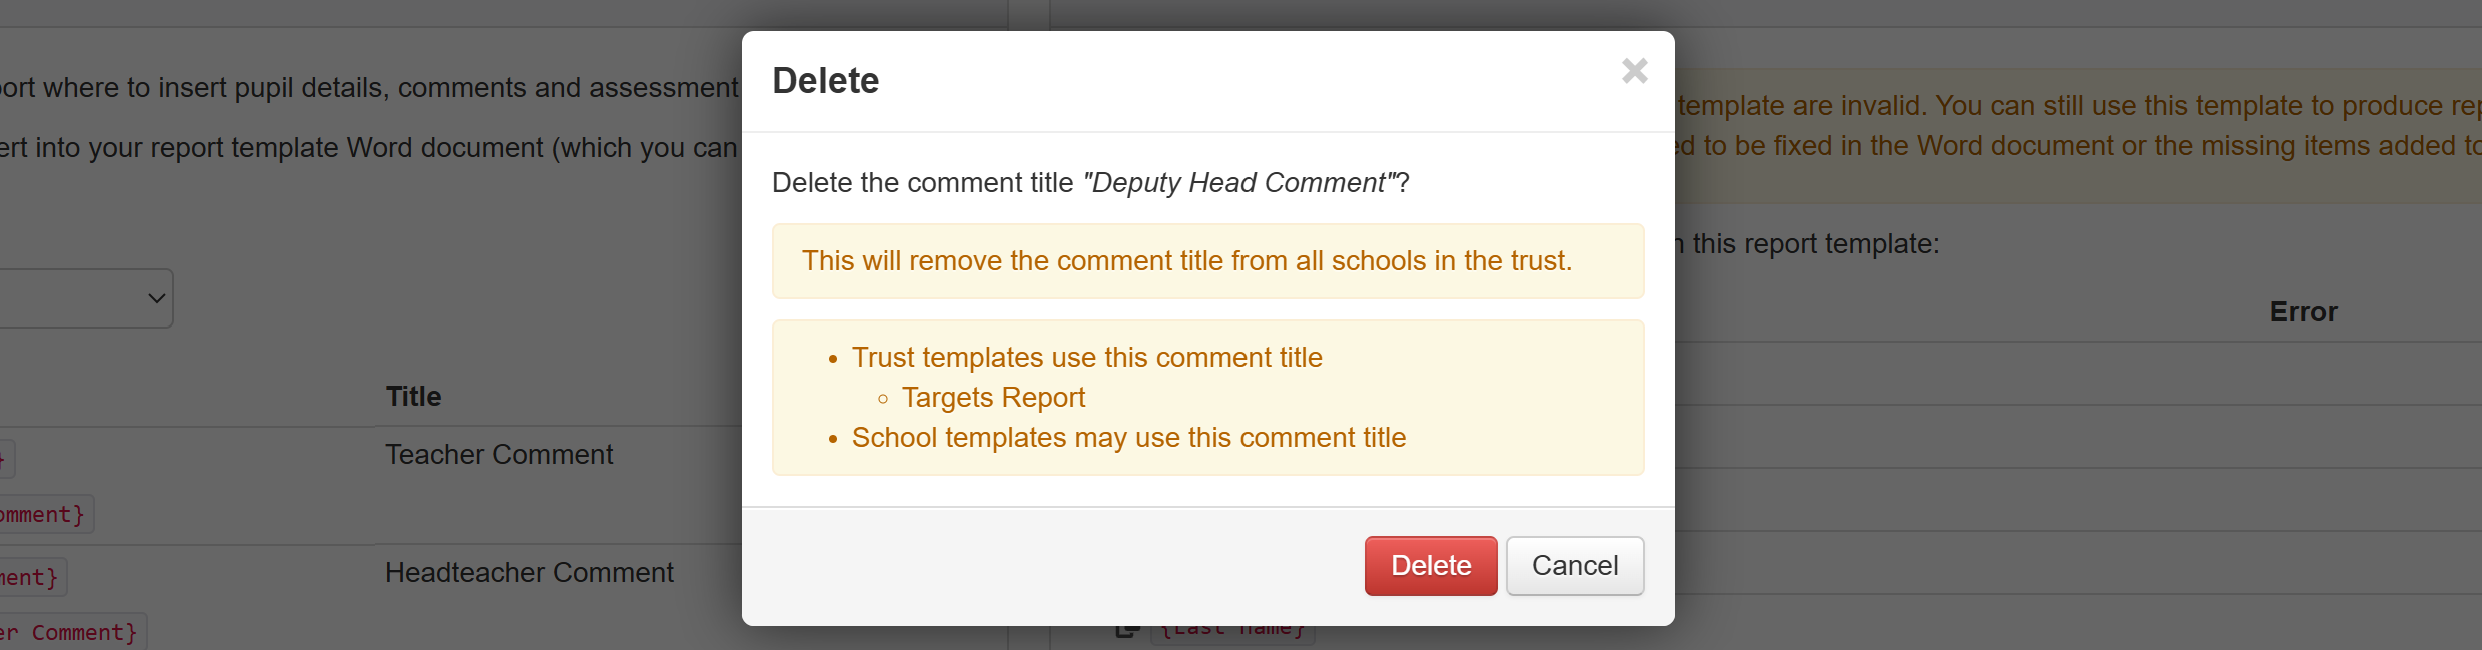
If you delete a comment placeholder, any templates including it will no longer work for that placeholder.
If you delete a comment placeholder, at school or trust level, then add a new one with the same name, any comments that were recorded against the old placeholder will be restored.
Renaming comment placeholders
It is possible to rename comment placeholders once added, but there are some things to consider and be aware of.
It is not possible to rename the default placeholders at school or trust level.
Placeholders added at trust level may not be renamed at school level.
To rename a comment placeholder, click the pencil icon next to its name.

This will allow you to choose a new name, which will also be reflected in the actual placeholder text.
Remember, that any existing parent report templates with the old comment placeholder in will also need to be updated.
When renaming a comment placeholder, at school level, you'll see a warning if you have any templates that will need updating. Otherwise the rename will just go ahead, as there's no risk of affecting existing templates.
When a comment placeholder is renamed at trust level, you'll see a warning regardless of any existing usage at school level.
Assessments and Progress
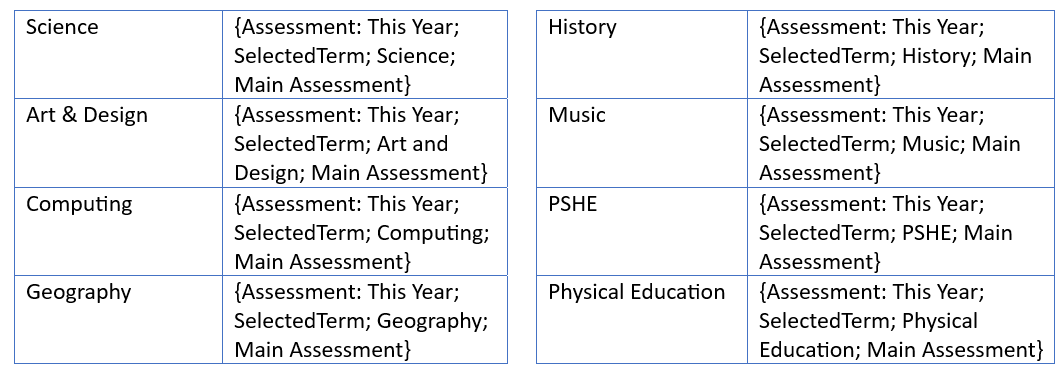
All the assessments you use in your school will be available for placeholders.
Just choose the various criteria to build the placeholders, then copy and paste them in.
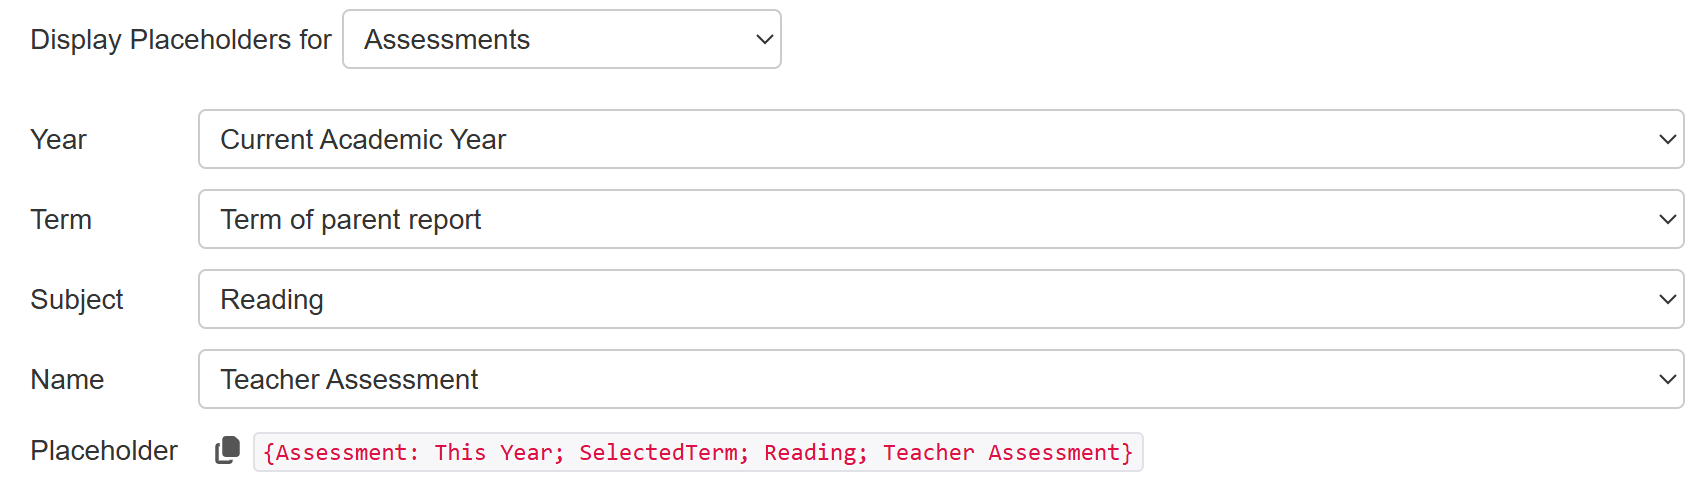
For Assessments, you can choose between specifying the term you want (e.g. Summer) or choose Term of Parent Report to create a placeholder that will use the term the parent report is created for. The former is useful where you want to include historical assessments in a report. The latter is useful where you have a standard template used multiple times throughout the year.
You can also choose Previous Term of Parent Report. This will create a placeholder that will insert the assessment for the term before the term the parent report is created for. For example, if you use this placeholder in reports created for the Summer term, this placeholder will insert the Spring assessment. Previous term is always the term before, not the half-term before. If a report is created for the Autumn term, previous term will be the Summer term of the previous academic year.
The range of years available will match the years you teach in your school, as defined in Admin > Year Group Range.
I've used the Selected Term option.
Adding effort grades
Insight is capable of storing any data in any format, and an assessment of effort is no exception. Effort assessment is available, by default, for all schools to enter. Effort is available in the Assessments placeholder section, and I've included it in my report for Reading, Writing and Maths.
Statutory assessments
The Statutory Assessments placeholders (EYFS, Phonics and KS2. KS1 is included despite no longer being statutory as you may still carry out the assessments and want to report them to parents) enable you to meet your obligations to report these to parents. There are Insight provided templates for these also.
Attendance
The attendance section includes a number of different placeholders for attendance data.

A variety of attendance data is available, including percentages and totals for attended, absences (including authorised and unauthorised), lates and days missed.
There are also placeholders for national attendance, local authority and whole school.
In addition to the standard placeholders, there are also a number of graphical placeholders available.
For more information on attendance placeholders, see the help guide on adding attendance data to templates.
Objectives
If you are recording Objectives assessments, it may be useful to report these to parents as, for example, recent achievements and things to work on. See the Adding Formative Objectives guide for detail on adding, and configuring objectives.
Provisions
If you have pupils accessing provision groups, it may be useful to list those in a parent report. The Provisions placeholders allow you to do this.
Choose the placeholder Style and the required timeframe. Timeframe may be selected from Active Now, This Year, Last Year, 2 Years Ago or 3 Years Ago.
Placeholders are available to list the provision types, the provision groups or both, for the pupil. They will be shown as a semi-colon separated list.

You can also choose Provision Table style. This will insert a table listing provision groups with columns for Type, Group, Aims, Entry Assessment, Exit Assessment and Effectiveness.
Uploading the completed template
Save the completed Word template ready to upload.
In Admin > Parent Reports choose the applicable template from the School Parent Report Templates list.
Click Replace Word File to select and upload the file. The preview will update to reflect the changes.
To make the template available to create pupil reports from, click Publish.

Click Publish, again, to confirm. The report will now be available via Pupils and Reports > Parent Reports for non admin users to create reports for pupils.
Invalid Placeholders
If the placeholders tab indicates errors, this means that there are placeholders in the template that reference data items missing in your school set up. This could happen for one of the built in templates or, perhaps, if you've imported a template from another school using Insight or just through a straightforward typing error. The report will still work, it will just ignore any invalid placeholders.
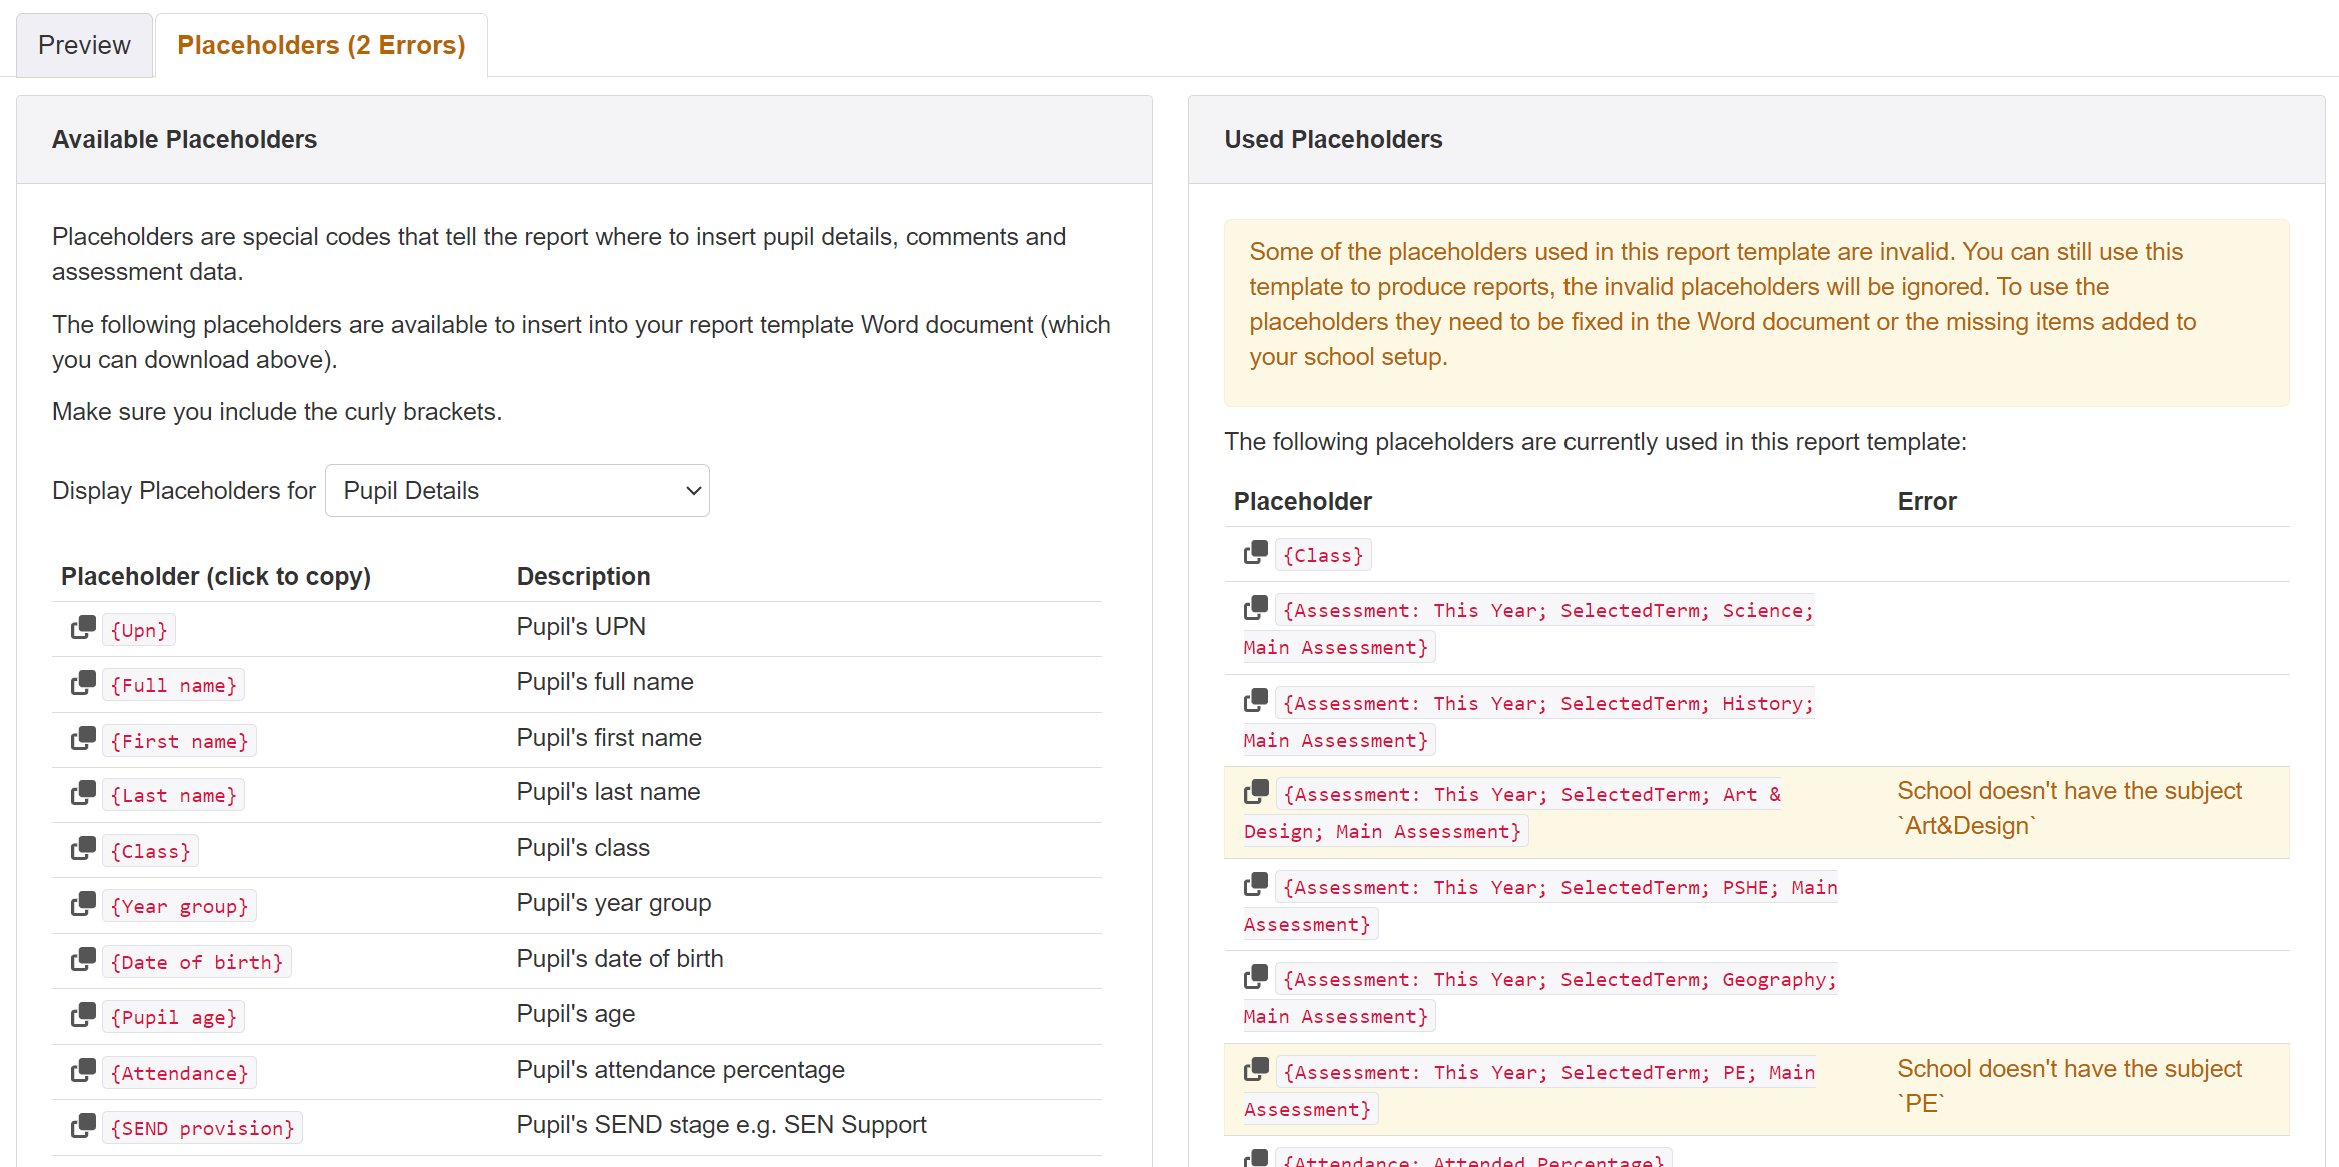
For example, if you copy (or use) the built in End of Year template it comes with a number of subjects that you may not be using. It also includes an Effort grade. If the template has placeholders for Effort, but you don't record an Effort grade, then this would represent an invalid placeholder.
To help fix placeholder errors Insight will indicate why the placeholder is invalid. You may need to add subjects or other measures to your school setup. Or you may just need to alter the placeholder text to match the setup you do have. Some elements, such as comments, can be added by any admin user. Others, such as Effort, will require Insight support to add for you. Just get in touch if you need any help with this.
Invalid placeholders are also indicated when you preview a template in Reports > Parent Reports.

You can click Show details to see which are invalid.
Approval Settings
By default, only Admin users are able to approve (or unapprove) parent reports. Only approved reports may be emailed to parents.
If you want Normal users to also be able to approve and unapprove reports, navigate to Admin > Parent Reporting > Approvals, tick the box in Approval Settings, and Save.

Email Settings
See the Emailing parent reports guide.
Deleting Parent Report Templates
Deleting a template will permanently remove it, and it will no longer be available to create new parent reports.
If you have any previously created or approved reports using that template, they will still be available to view, including for previous years. In this scenario, it will also be possible to create new reports using that deleted template. For example, you may have created reports for all but one pupil, then deleted the template, so this allows you to complete the creation task without having to recreate the template.
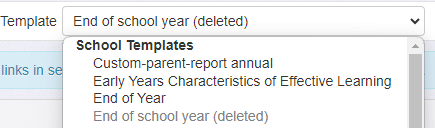
Any deleted templates will still appear in the Reports > Parent Reports Template filter list (if you have any created reports for the selected academic year) but it will be greyed out and include deleted in brackets after the name.
Restoring Previous Template Versions
Each time a report template is uploaded, Insight keeps a copy. This can be helpful if you ever need to revert to an older version, or just remind yourself about a previous layout.
To see the old template revisions, click the Previous Versions tab.
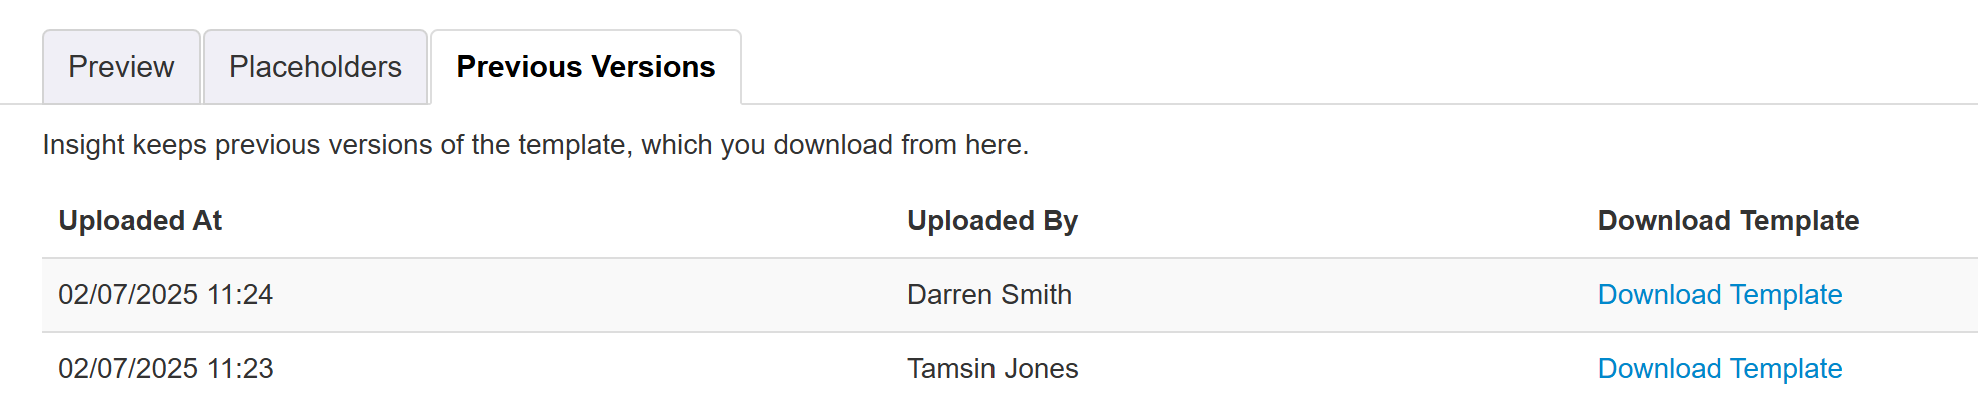
Click Download Template to download it. This makes no change to the existing version in use.