Provision Mapping - using the provision map
 Updated
Once you've got your provision group types added and your provision pupil groups underway, you are in a position to start making use of the provision map.
In this guide, we'll walk through how to use the provision map as the hub from which to manage your groups. We'll also look at how you can record the effectiveness of the group, for each pupil, in order to judge its success.
Click Provisions, in the menu bar, to open the Provision Map page, with any provision groups running in the current academic year shown by default.
The Provision Map will be displayed.
Group by Provision Type
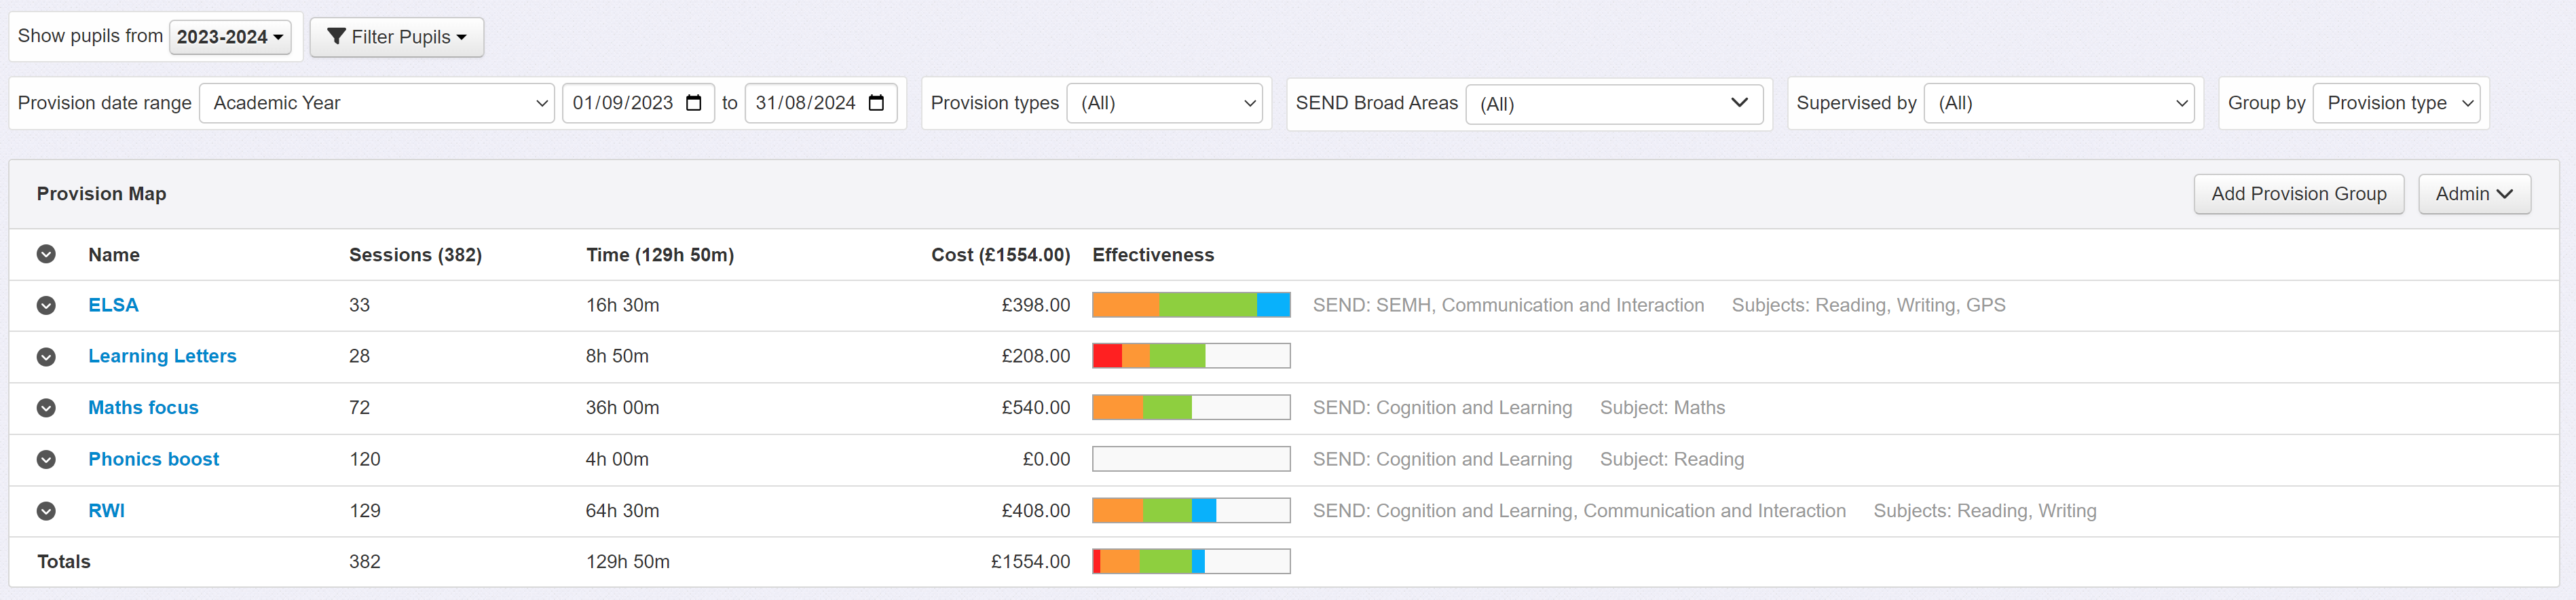
The default view is grouped by Provision type.
Viewing aggregate data
Next to the headers are some aggregated figures, in brackets, to help you understand how your provisions are running and make decisions about how they continue.
- Sessions - This is the sum of all the displayed sessions.
- Time - The sum total time being used to deliver your displayed provision groups.
- Cost - The total cost of delivering your displayed provision groups.
- Effectiveness - At the bottom of the Effectiveness column is a bar showing the aggregate of all the effectiveness assessments for the displayed groups. The other totals are also repeated in this row.
It is worth noting that the values are for the full range of dates each group is running for, not the cost to date.
Applying any filters, to limit the groups on display, will update the values accordingly.
Filtering the provision map
By default, the provision map will show each of your provision types and the associated aggregate data against them. From this summary view, you can drill down to get the information you need.
To the left of the map are small arrow icons. Clicking the one to the left of Name will expand the whole map, and all of its content. This might be useful to give a sense of how many groups are running, but a more focussed view is likely to be more impactful.
Click the arrow next to a provision type to expand the view to see any pupil groups for that provision. Clicking the arrow next to the group name will expand that group, enabling you to see the individual pupils within it.
If you are an admin user, you will also have a Cost column giving you a breakdown of costs within each tier, down to the cost per pupil. These values, combined with the Effectiveness, will help you to make a decision about the value that group delivered.
At the top of the map is the standard Filter bar. Use this to filter the view to the specific pupils you are interested in.
Beneath the filter bar are some additional options to filter and tweak the map display.
The Provision date range lets you choose the dates to show provisions for. Use the menu to quickly add some common date range options, or pick specific dates with the calendar tools.
The Provision types menu lets you quickly filter the map to show just the type of provision you are interested in.
The SEND Broad Areas menu allows just the Provision Types that focus on the selected SEND area to be shown.
The Supervised by menu lets you limit the display to just those groups supervised by the member of staff, or role, you choose. This is useful if you want to just see your groups, perhaps, to review schedules.
The Group by menu changes the top tier used in the map. The default grouping, by provision type, gives each type in order and is described above.
Group by Provision Group
This is designed to provide a working provision map, listing each group and its associated details.
It is also the best view for printing, and has its own dedicated Print button to do so.
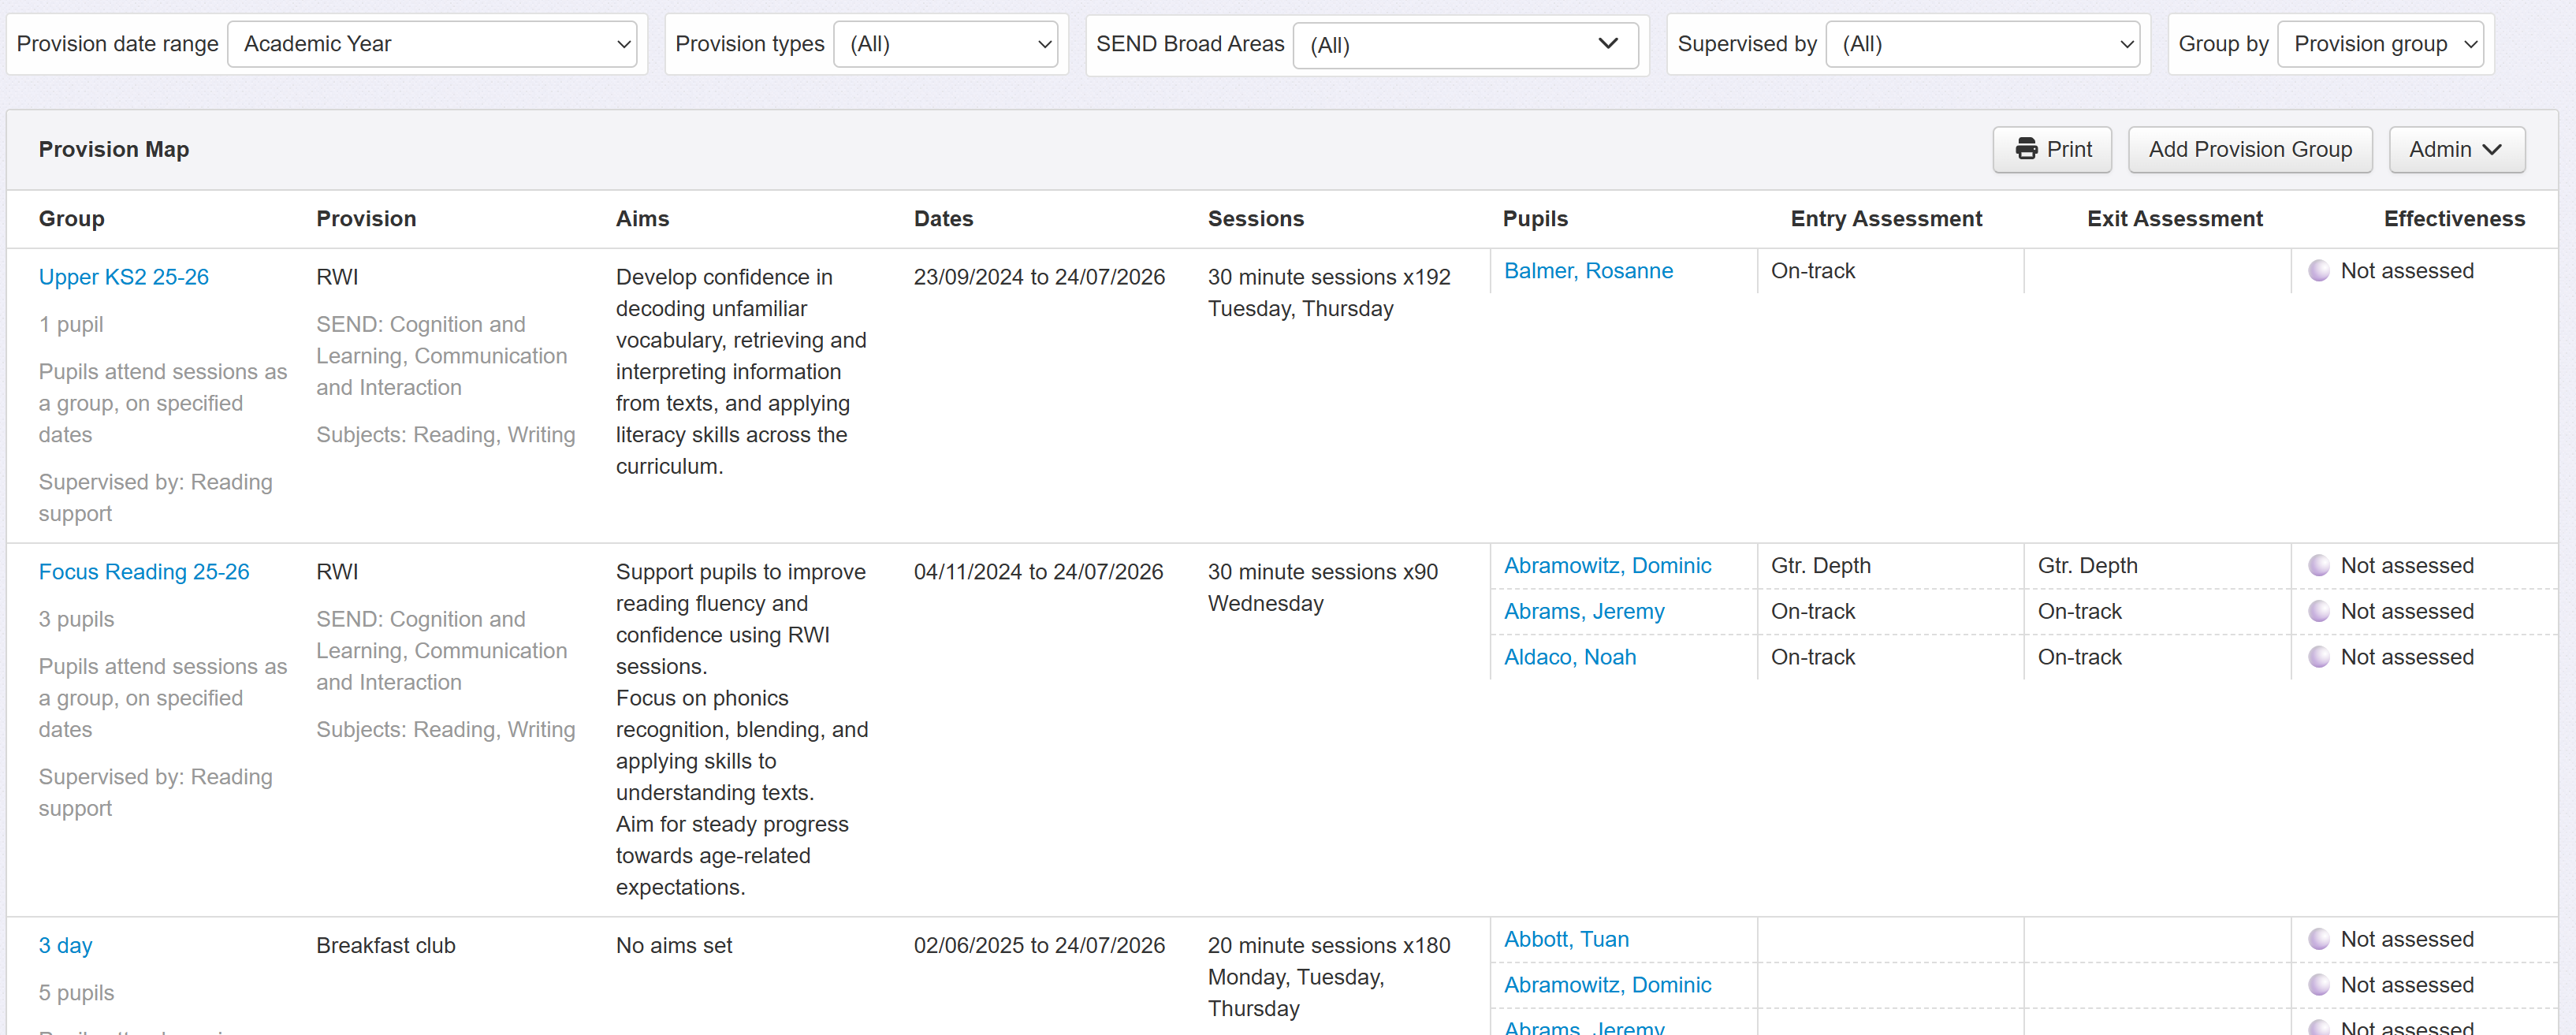
Combined with the other available filters, such as year group and Supervised By, it is ideally suited to allow you to just see the groups you're interested in; just those that you're responsible for perhaps.
Where you have groups that have specified dates, the Sessions column will include the days the group runs on. If you have also added some additional custom dates, or changed the day in some weeks, the description will indicate this by adding + Ad hoc after the day(s).
To help with day to day usage, this view also prints effectively, in landscape or portrait. Use the Print button to access this view.
Group by Pupil
You may want to produce a simple pupil list to enable you to see all the groups a pupil is part of. Choosing to group by pupil achieves this.
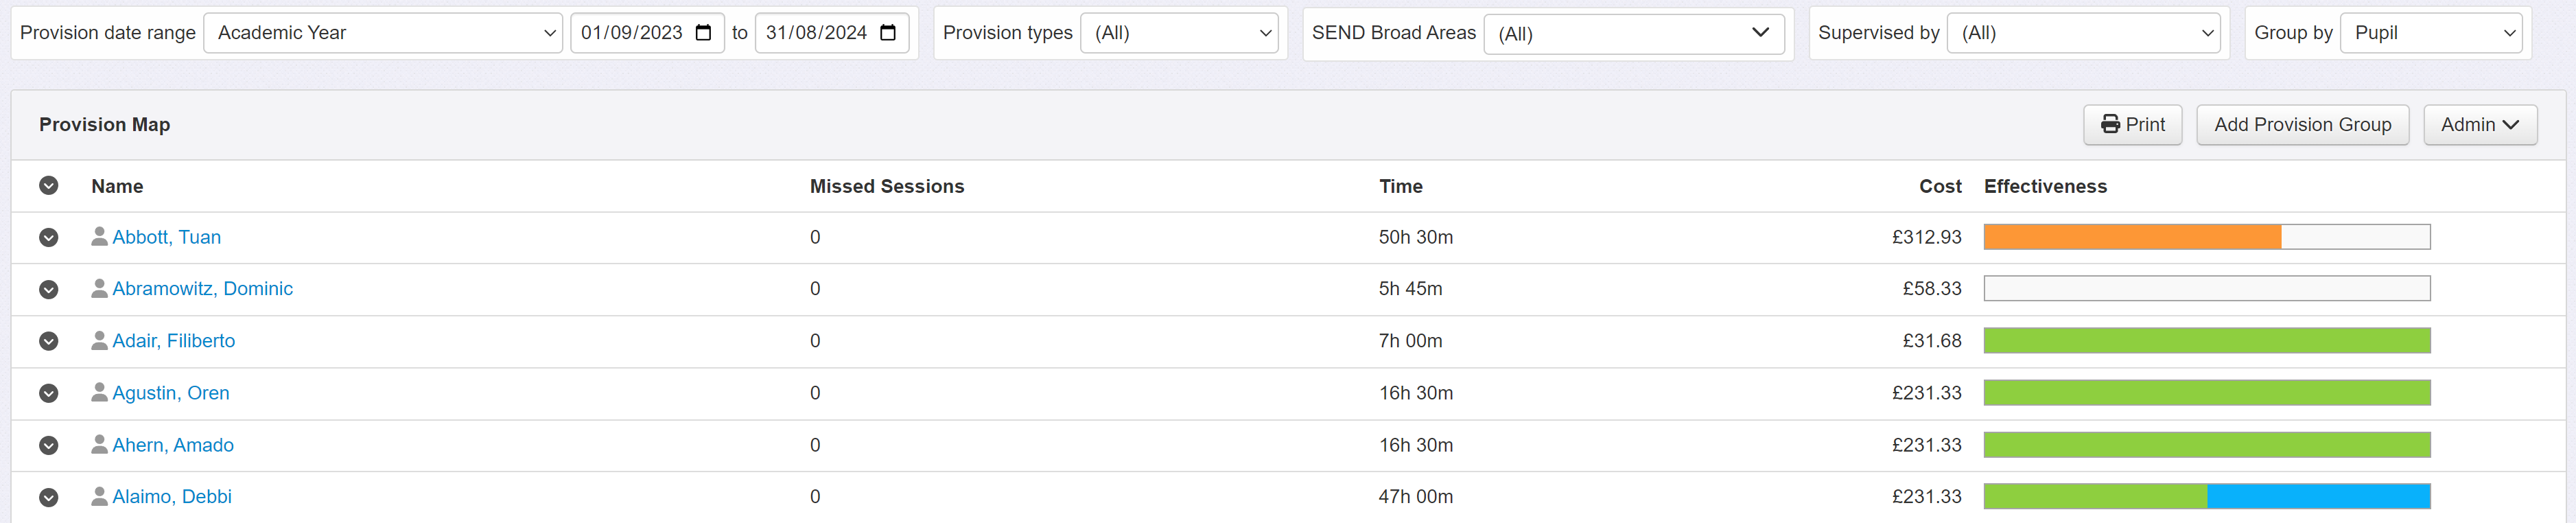
Click a column heading to sort the data on that field. For example, sort on the Cost column to see which pupils have had the most/least spent on their provisions.
When sorting by Effectiveness, an average score is created for all the provision groups a pupil is part of. The scores are:
- Not Effective - 1
- Partially Effective - 2
- Effective - 3
- Very Effective - 4
The average score is then used to sort the Effectiveness column.
Group by date
Group by date, can only work for groups you chose to specify the dates their sessions run on. It lists all the sessions in order of date. Only sessions that are running within the selected Provision date range will be displayed.
Group by Staff
Grouping by staff allows you to easily review spending on different staff members. This can support budget decisions and deployment of staff according to successes in proven areas. This view functions in the same way as Group by Type, but the primary grouping items are staff members rather than provision types.
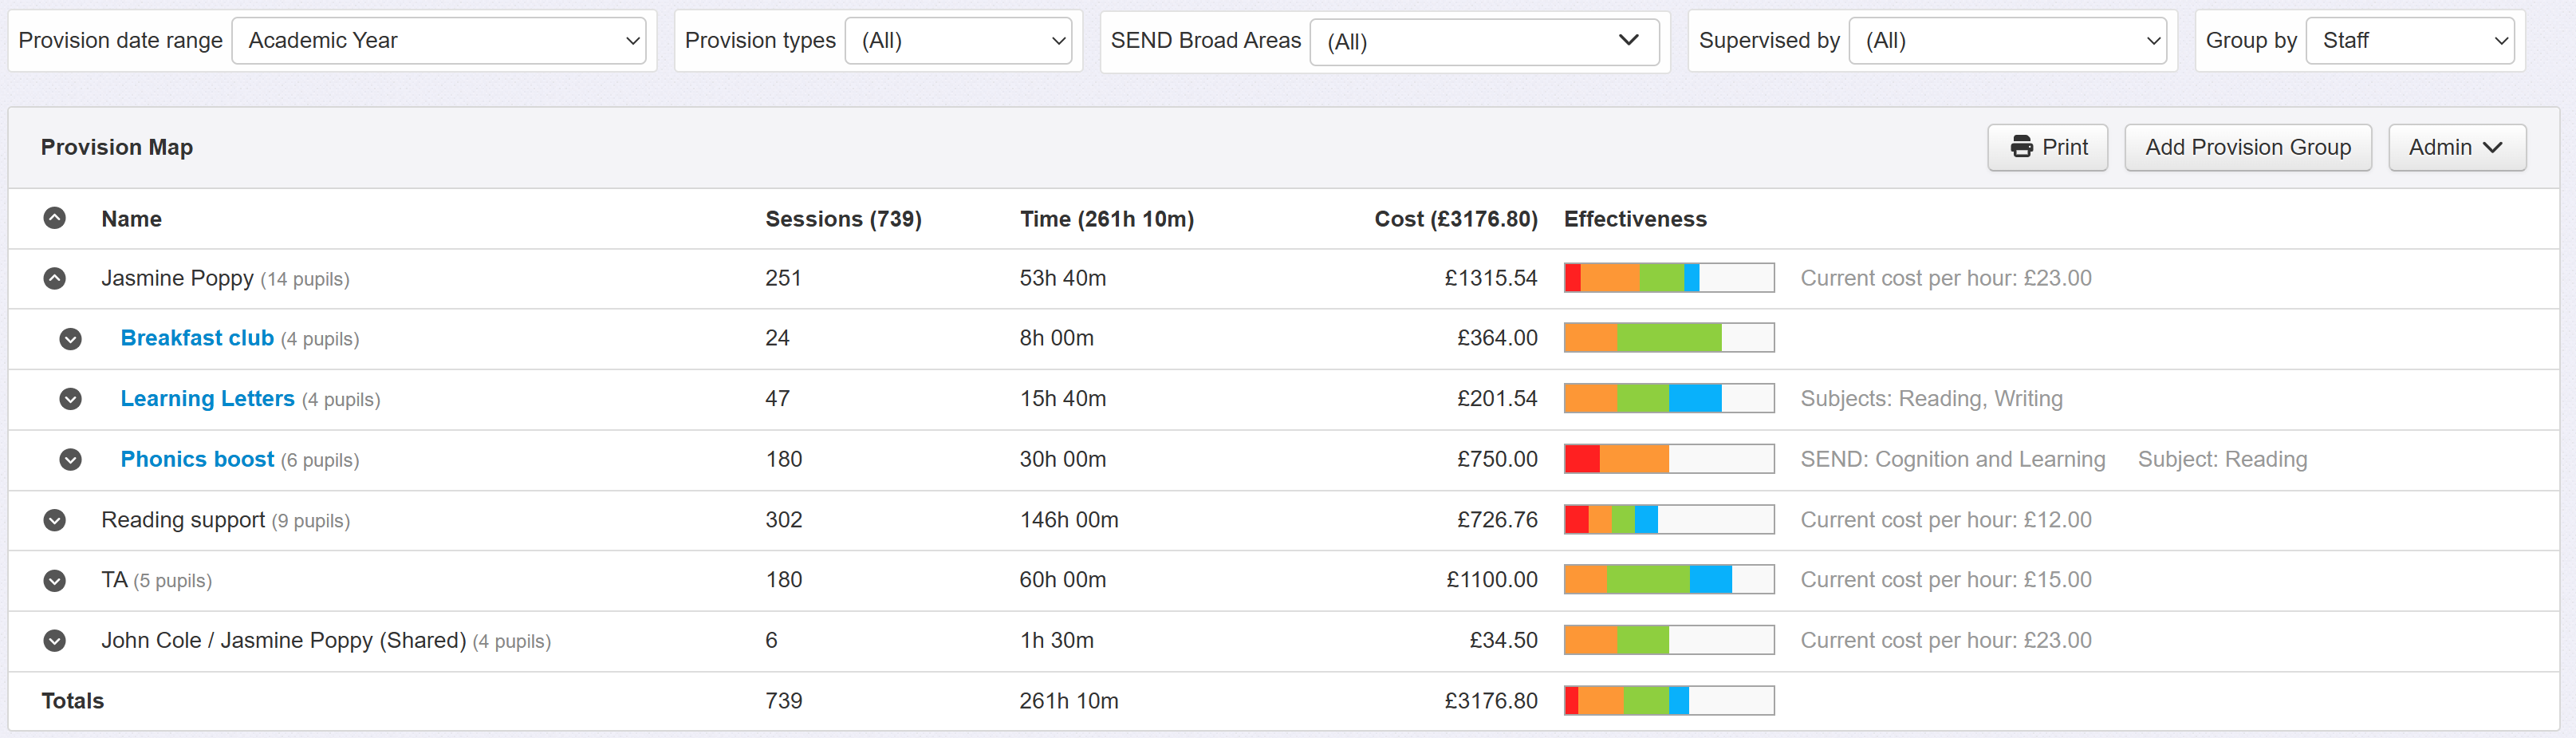
If a group has no supervisor, it will still appear as Unassigned.
Occasionally, you may have a provision group where the supervisor has been removed as a user. In these cases, they will be listed as Unknown User.
If you have any provision groups with multiple supervisors, they will appear at the bottom of the list as a shared combination. Costs will be calculated accordingly; for example, if each staff member is listed as costing £20 per hour, the shared group will cost £40 per hour.
Time, Sessions and Cost
The intent of the Provision Map is to present meaningful data for the groups and pupils displayed. As such, applying filters (such as gender) will affect the display differently depending on whether a Provision Group is set as a one-to-one or a group session. Each category will display as follows:
Time -
Total time for a group where pupils attend as a group is the same, regardless of the number of pupils in that group that are displayed, unless 0 when the group is not displayed at all. In other words, the time is the same regardless of the number of pupils in attendance, as the session runs for the pupils together.
Total time for a group where pupils have one-to-one sessions is the sum of the time for each individual displayed pupil. In other words, the time differs as each pupil has their own individual session.
Sessions -
Total sessions for a group where pupils attend as a group is the same regardless of the number of pupils in that group that are displayed, unless 0 when the group is not displayed at all. In other words, the number of sessions is the same regardless of the number of pupils in attendance, as the session runs for the pupils together.
Total sessions for a group where pupils have one-to-one sessions is the sum of the sessions for each individual displayed pupil. In other words, the session number differs as each pupil has their own individual session.
Cost -
Total cost for a group where pupils attend as a group is the same regardless of the number of pupils in that group that are displayed, unless 0 when the group is not displayed at all. In other words, the cost is the same regardless of the number of pupils in attendance/displayed, as the session runs for the pupils together.
Total cost for a group where pupils have one-to-one sessions is the sum of the cost for each individual displayed pupil. In other words, the cost differs as each pupil has their own individual session.
Evaluating and concluding provision group
To evaluate, or make changes to, a provision group, find the one you're interested in from the provision map and click its name.
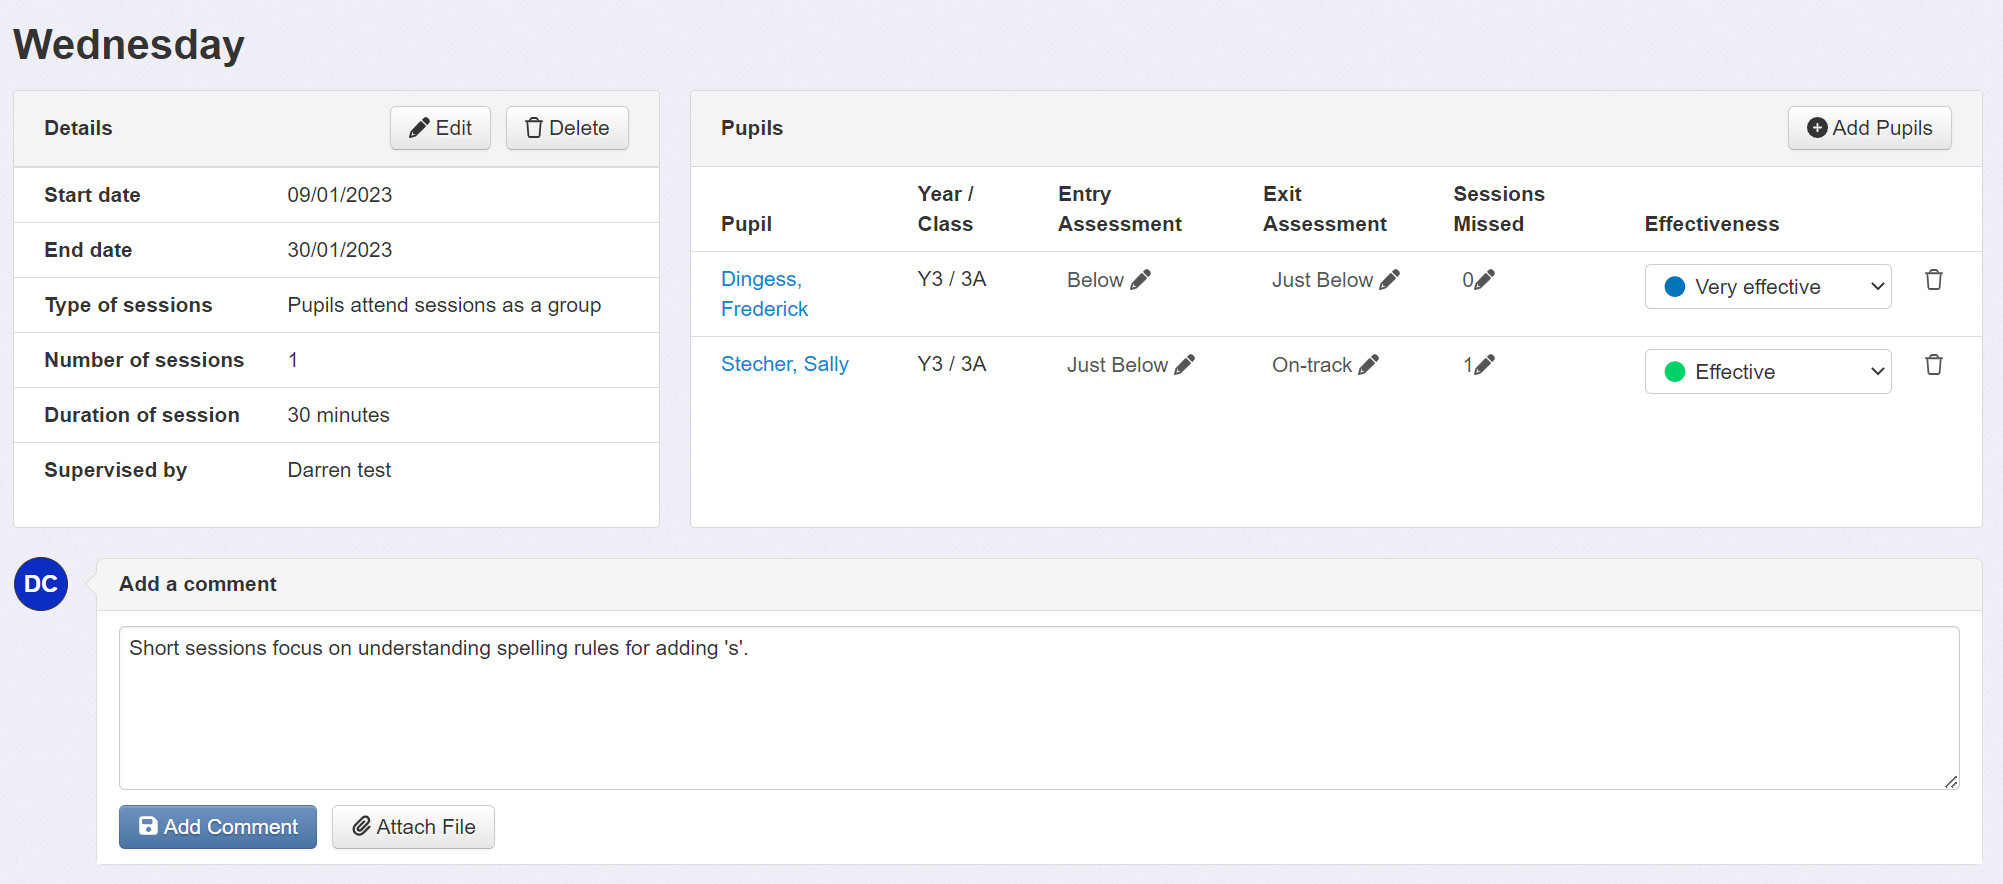
The Details pane allows you to make changes to the group or delete it entirely.
The Pupils pane shows you the pupils in the group plus the following optional evaluation records.
Entry/Exit Assessment - You may want to record an assessment to help demonstrate progress. You can choose the applicable mark scheme and enter the results here. See the Provision Groups guide for more detail on Entry/Exit assessments.
Sessions Missed - If a pupil misses any sessions, it may be useful to record it here. Particularly if this may form part of your accountability or has a significant impact on the success of that provision group for the pupil.
Effectiveness - This is where you can record an overall judgement for each pupil involved in the group. The measure is designed to give a snapshot view of success (based on any contributing factors you may be aware of) rather than a detailed record of learning. Learning Plans are provided to enable this level of detail for a pupil. The Provision Map will show a graphical summary of effectiveness for each group and overall Provision Type.
The Add a comment pane allows you to add any pertinent details about the group. For example, you might want to define specific targets or add a brief narrative as the sessions run. Each comment appears in isolation to aid ease of reading and allow comments to be deleted if required.
Comments may be added for an individual pupil, the whole group, or a selection of pupils. This is useful where you may have comments for the group, such as a target, or for just one or two pupils, such as notes on progress. Any comments will also appear on the individual pupil Provisions tab, in Pupils.
It is also possible to attach files as appropriate (the maximum file size is 10mb). These could be applicable guidance or photos of the group in progress, for example.
Creating a new group from an existing group
Once your group has concluded, and all necessary evaluations made, you may decide that some pupils no longer require this provision type. Equally, you may have other pupils who would benefit from joining the group.
If you delete pupils from a group, you will lose the record of their participation, and the associated evaluations. So it is better to allow the existing group to finish and create a new group.
To avoid having to recreate a new group from scratch, use the Copy button in the Details pane.
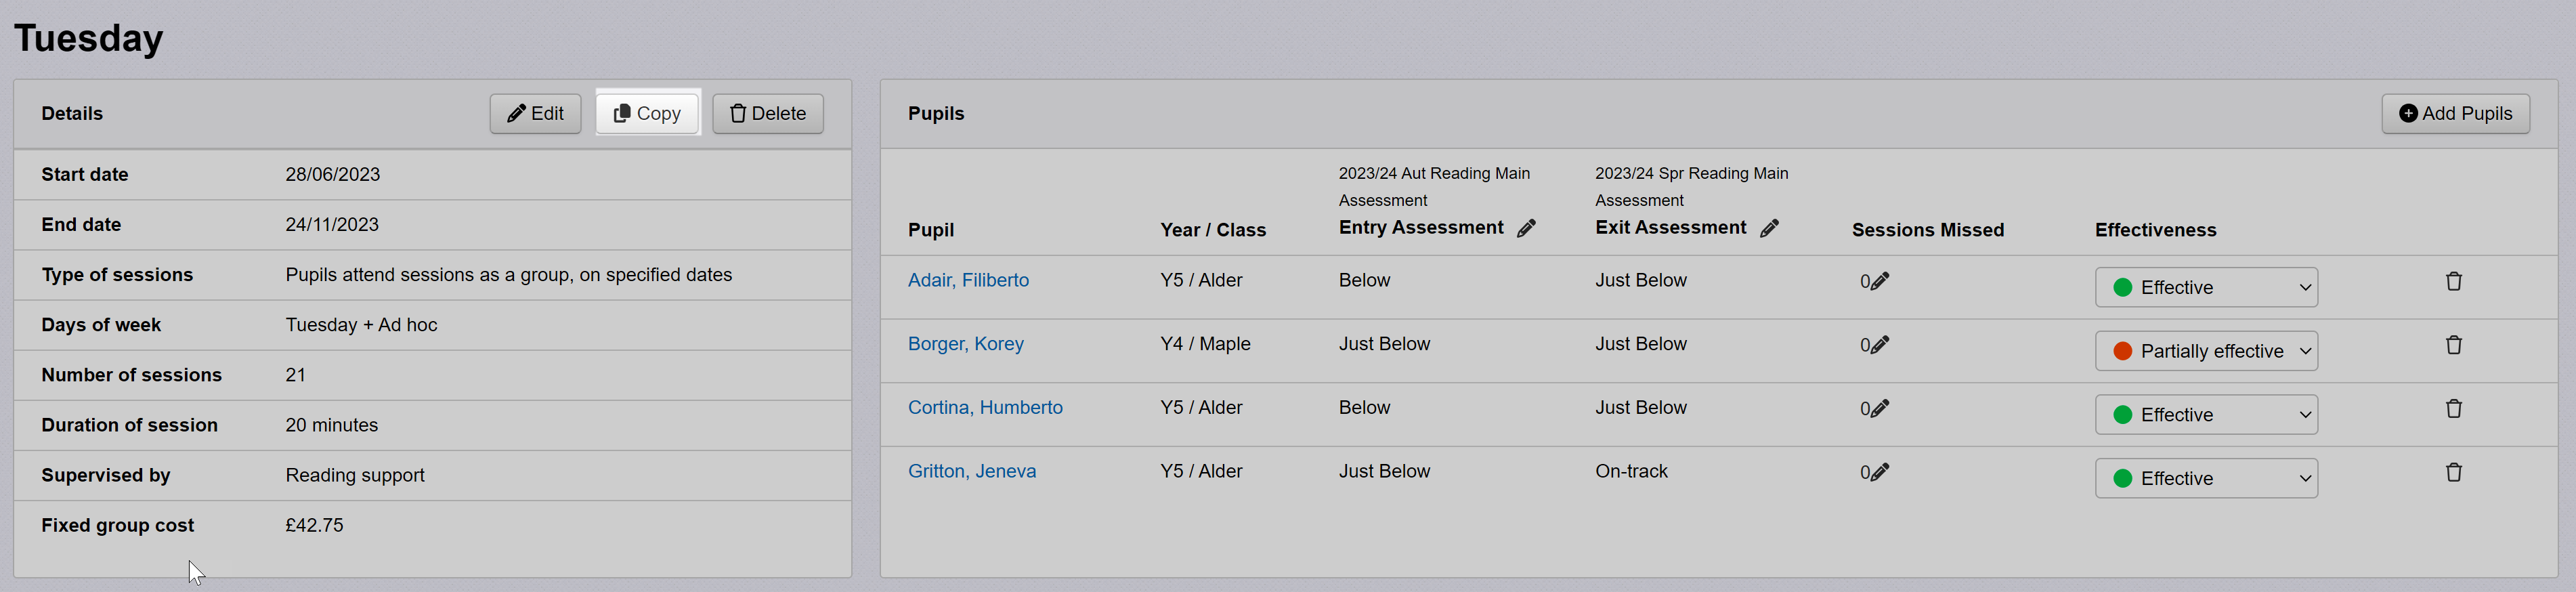
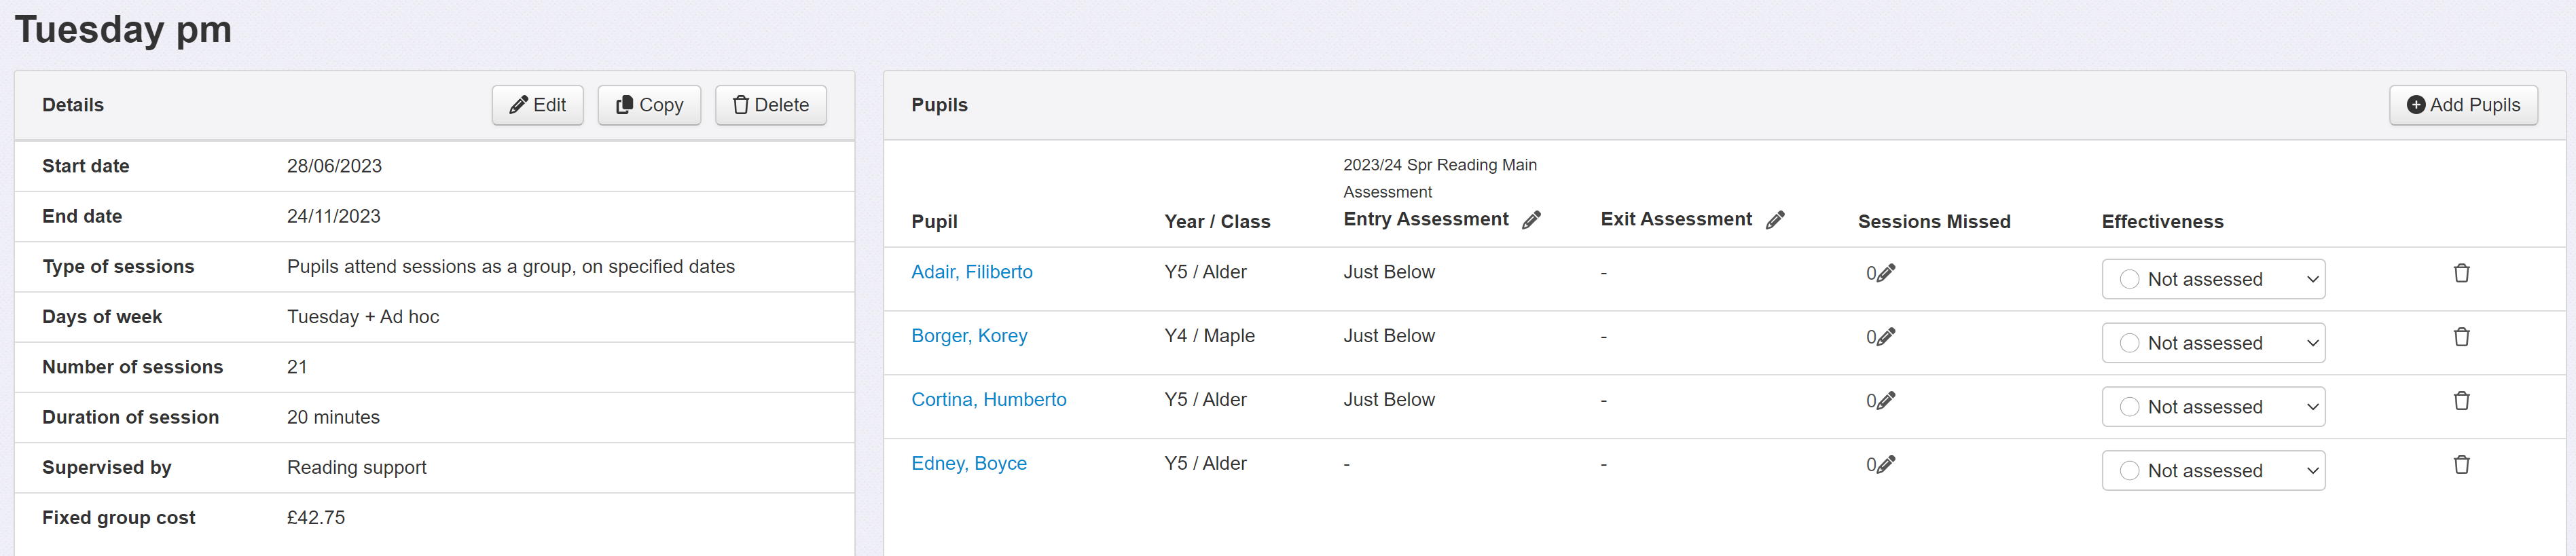
A window will appear asking for a new name (you can use the same name, but this may make it difficult to distinguish). You also have the option to copy the outgoing Exit Assessments as Entry Assessments in the new group.

Once the new group is created, simply remove those pupils who are no longer in receipt of the provision and add any new pupils. The new group will be automatically saved.
When you've finished making changes, use the breadcrumb trail links at the top of the screen to navigate back.