Using the Objectives page to enter assessments
 Updated
This guide shows how to use the Objectives page to enter assessments, and offers tips to save assessment time and make the data work for you. If you're new to Insight, you may find it useful to read the Insight 101: Formative Assessment guide first if you're new to Insight.
We've put together this 6 minute video as a general introduction to using the Objectives page of Insight.
It covers:
- How to load Objectives grids and what you should see on the page;
- How to enter assessments against objectives, including how to do this for several pupils or objectives;
- How to delete assessments when you've made a mistake;
- What the summary data rows are telling you about your assessments;
- How to make your overall teacher assessment above the grids;
- How to assess pupils who are working out of year.
Do bear in mind that what you see in your Insight account might differ to what you see in the demo - Insight will have been (or can be!) customised to match your school's approach. You might have different objective grids, different statements, different assessment options or even different summary data.
Things this video doesn't cover that may be useful are:
- How to use the Filters and Groups to choose different cohorts
- How to enter other kinds of summative data (such as tests)
Using the Objectives page
The Objectives page allows you to Filter to select the pupils you want to view or enter assessments for. It does not allow the page to be Grouped.
The toolbar at the top allows you to select the objectives collection you want to load (from the collections you have added for your school).
The as of date will be today by default. If you want to look at the assessments as they were on a previous date, or enter historical data, change the date accordingly. Mostly, you'll want to leave it as default. Click Load Grid to show the objectives.

The Filter objectives tool lets you type a few keywords to find any particular objectives you want to focus on.
If your grid has strands (e.g. areas of maths) identified, the By strand tool lets you choose one to focus on.
If your grid has key objectives identified, the Only key objectives tool will filter to only show those ones.
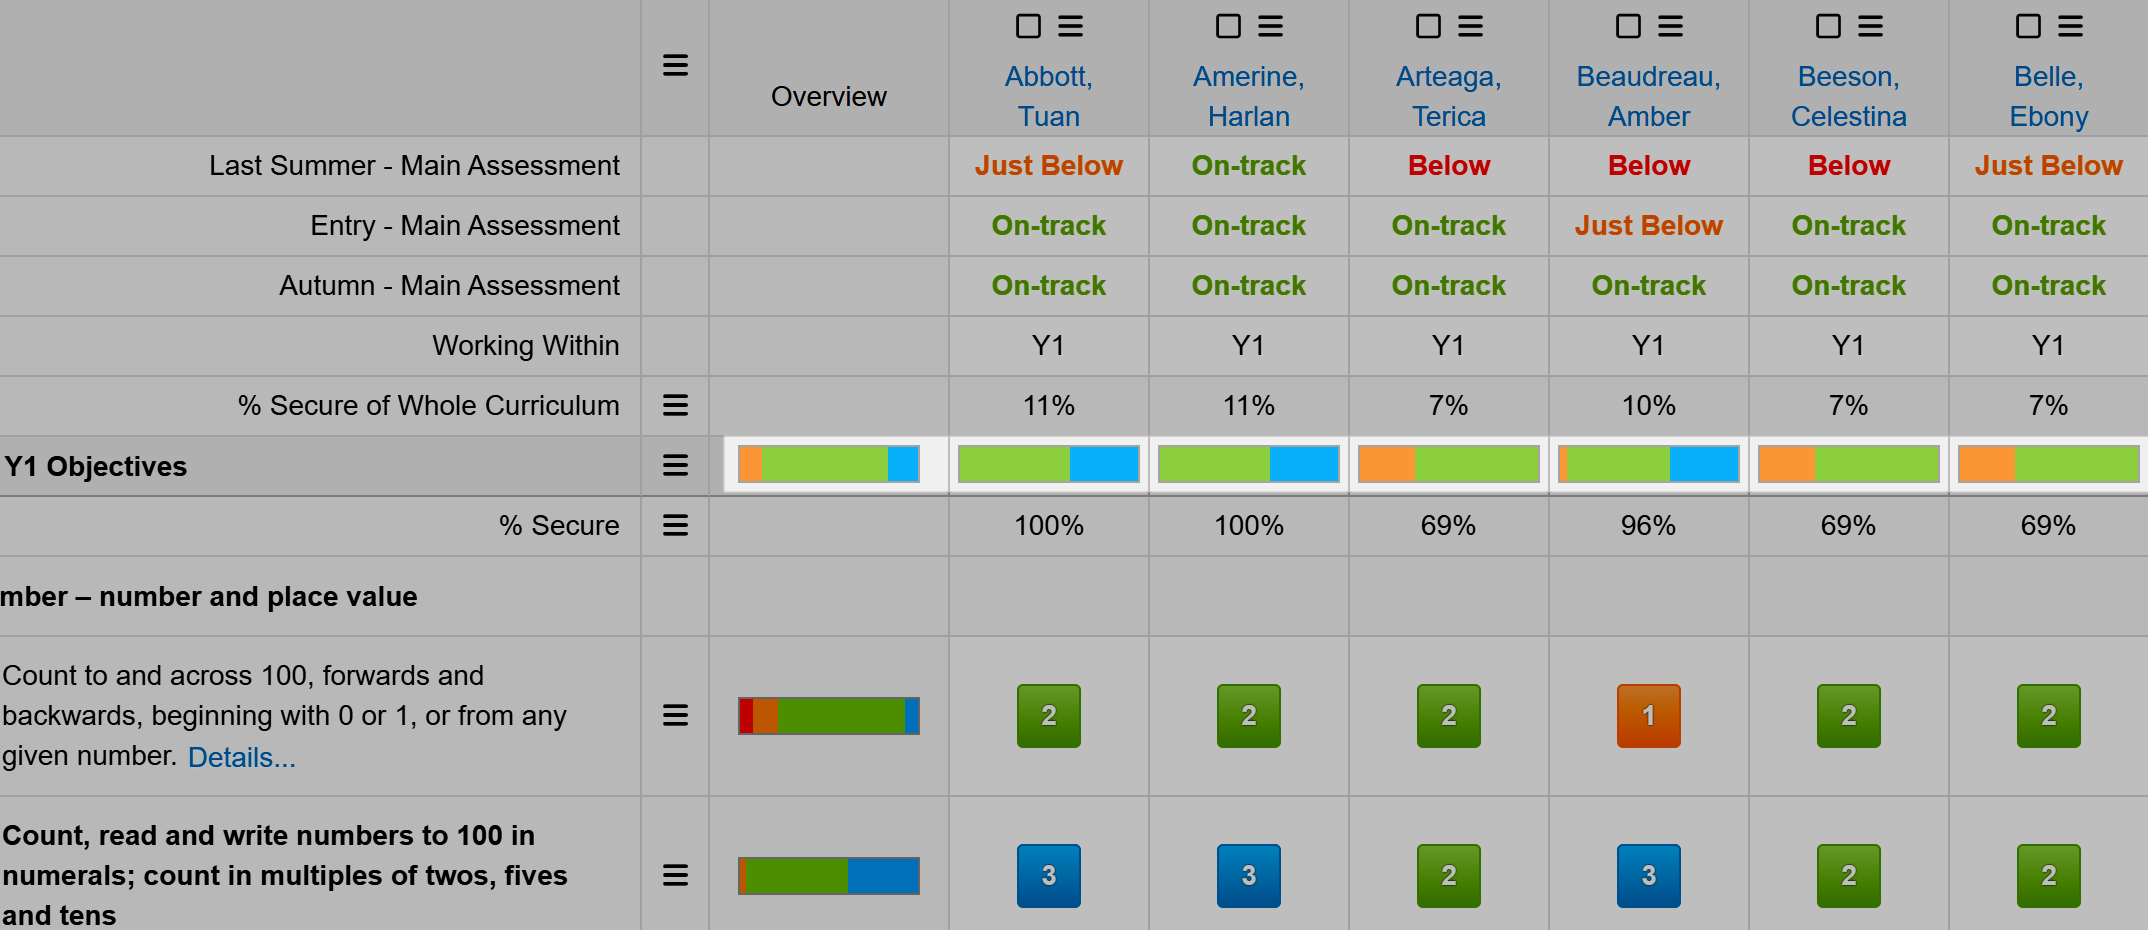
I’ve opened the grid with my class and the Maths objectives we’re using in my school.
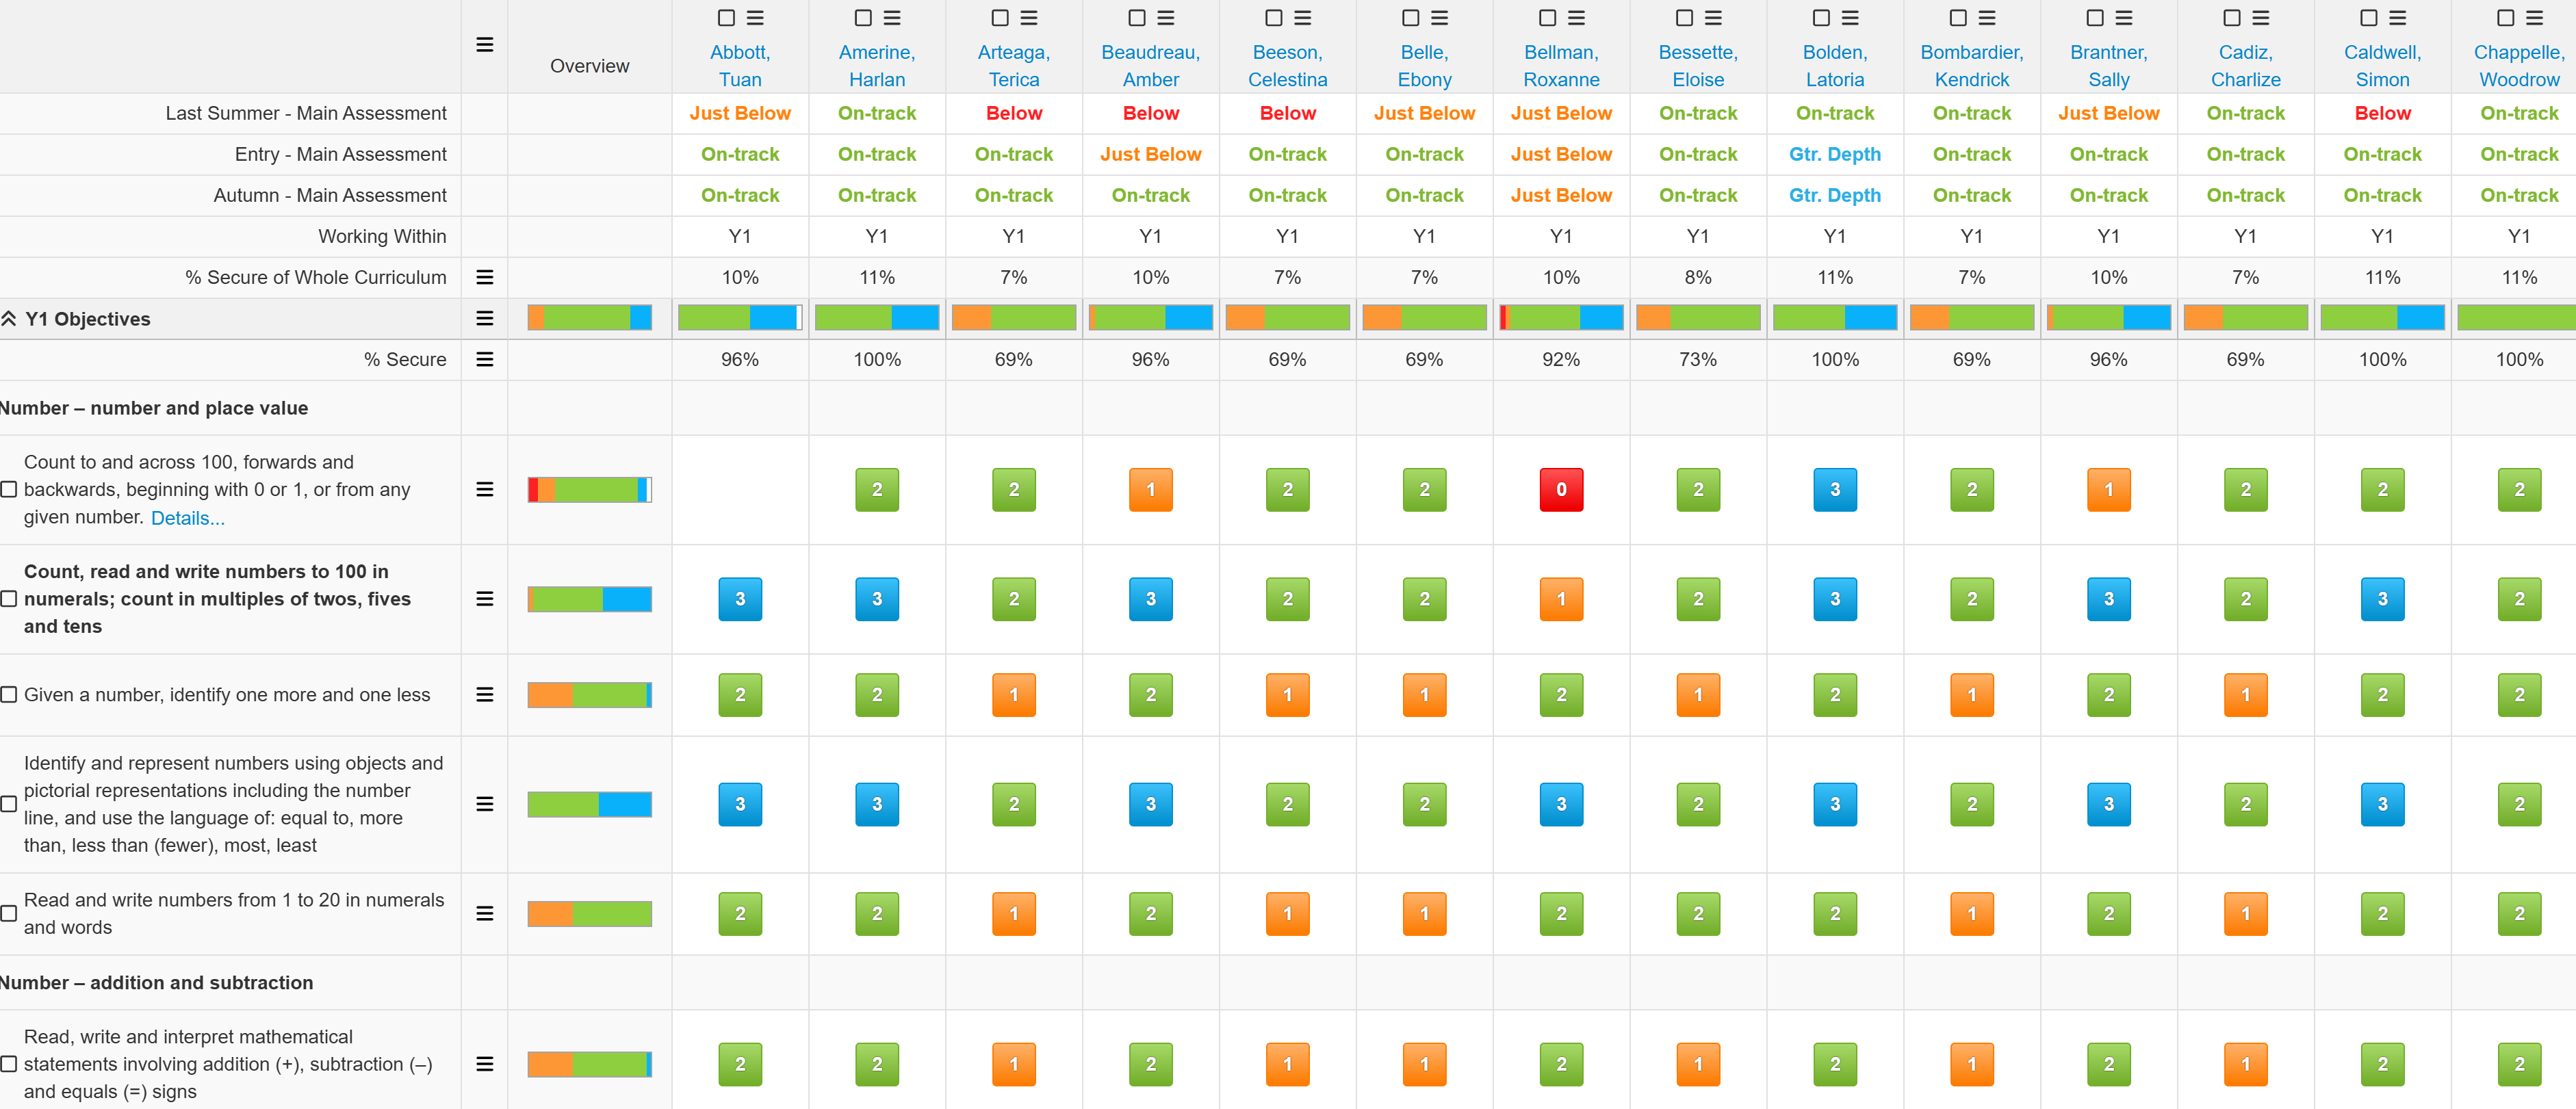
I’ve got all my pupils along the top and the objectives on the left. If any of your objectives have been set as Key Objectives, they’ll be in bold text.
Insight indicates which year band the pupils are working in. By default, this is the highest one they have objective assessments in, but you can click to override this.
Insight knows my class is Year 1 so it’s opened up the year one objectives.
I can easily click the chevrons to view objectives for other year groups. This is useful if you have any pupils working out of year group or you want to review previous attainment at the start of an academic year.
Most of my objectives are already assessed, for all pupils. Any missing ones will simply have no coloured number box.
Entering individual pupil objective assessments
To enter an assessment, just click in the cell for the desired objective and pupil.
An assessment form will appear with the New Assessment tab active.
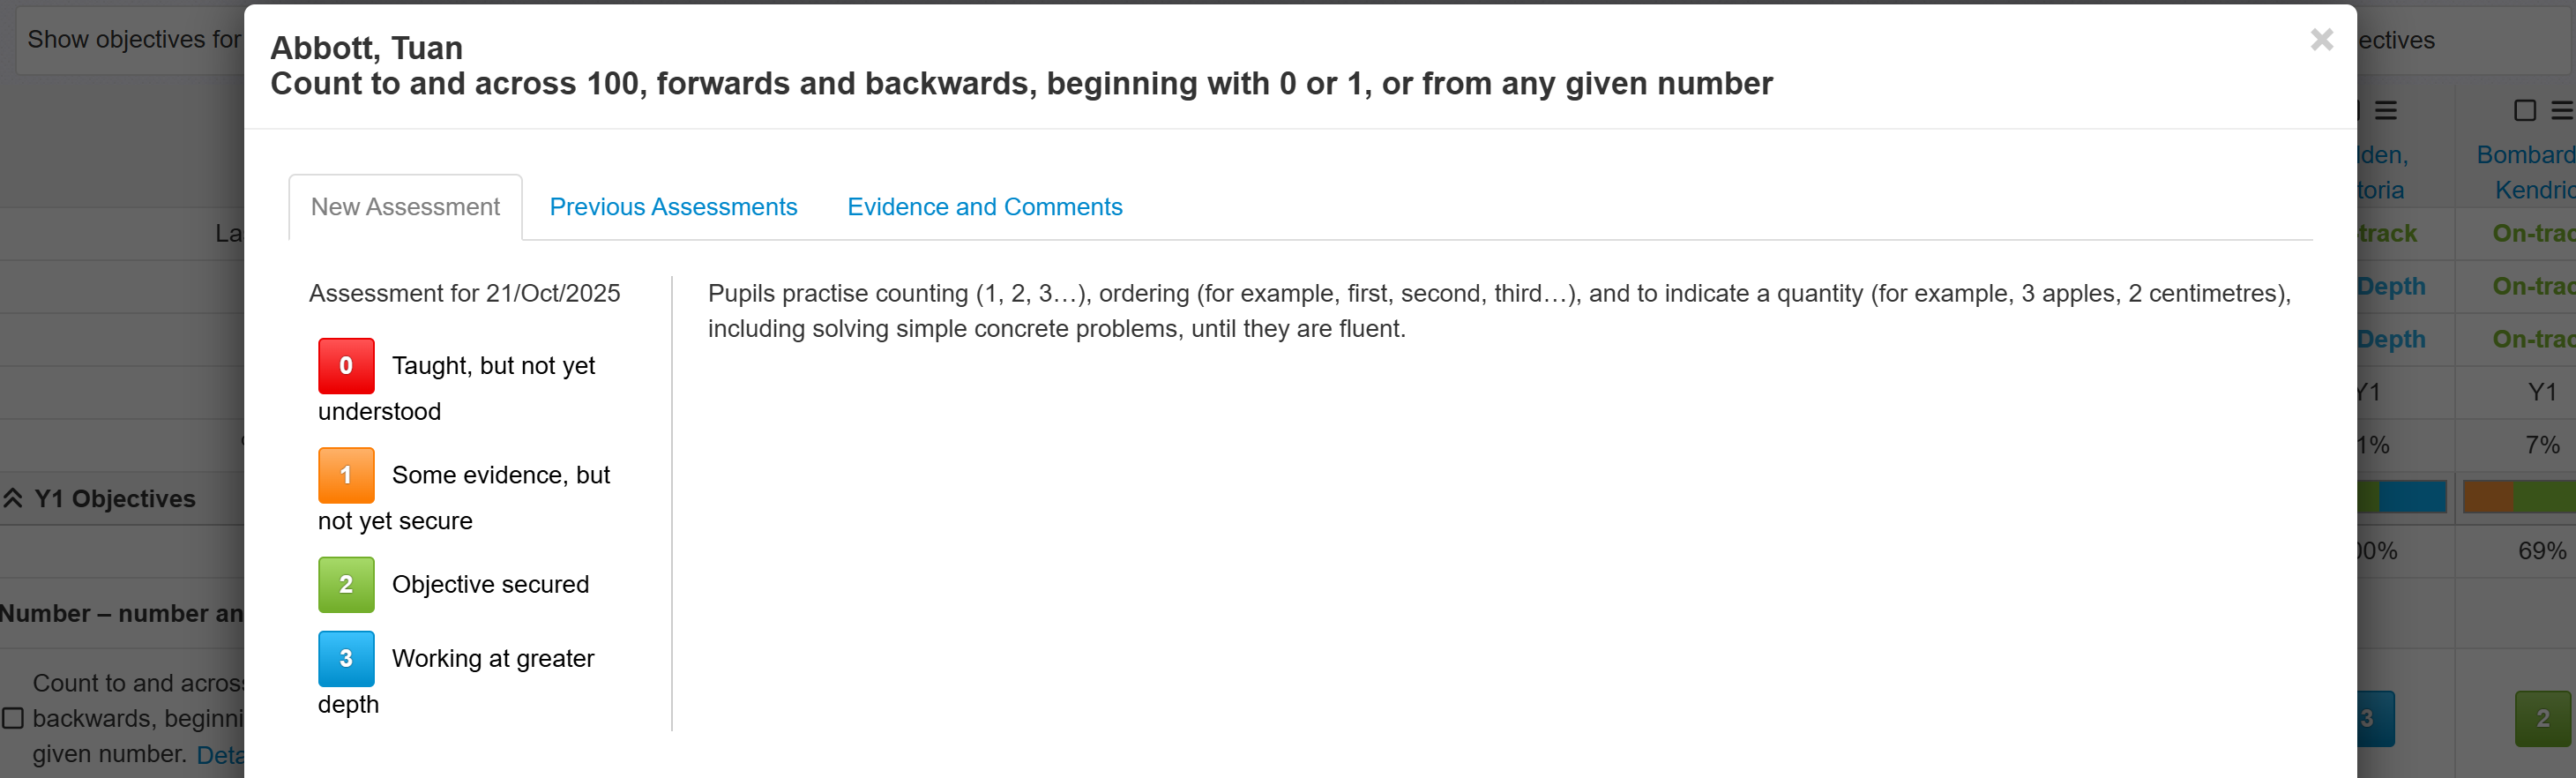
The available assessments will be displayed here. They are known as Evaluation Descriptions, and the default ones are:
- Taught, but not yet understood
- Some evidence, but not yet secure
- Objective secured
- Working at greater depth
Just click the desired assessment, on the left, and it will be entered for that pupil.
All formative assessments save as you go to protect from losing valuable data. If you change your mind about an assessment, you can just click to alter it. There is also an Undo button. It will undo any assessments made in the current session, but if you leave the Objectives collection the Undo is reset.
The Previous Assessments tab shows any previously entered assessments (including within the same term or half-term).

The Evidence and Comments tab allows you to add any notes regarding achievement of the objective. You can upload images (but not video or audio) to support your evidence. Any evidence will appear in date order to maintain the note history. Any objective with evidence added will have a paper clip icon shown on the assessment:

Entering multiple objective and pupil assessments
Save time by entering multiple assessments together. For saved groups, or particular pupils, I may want the same assessment multiple times.
This is where the tick boxes come in.
You will notice that both objectives and pupils have them. Let’s start with the objectives.
Ticking an objective will highlight the whole row. By adding the tick, we’re telling Insight that we want to enter an assessment for the whole highlighted area. In this case, the ticked objective and all the pupils I have displayed, including those that I may need to scroll to see.

To actually enter the assessment, I just need to click in any of the highlighted assessment cells beneath the pupils.
The assessment form will appear again but, this time, it will indicate the number of pupils the assessment will be entered for at the top.
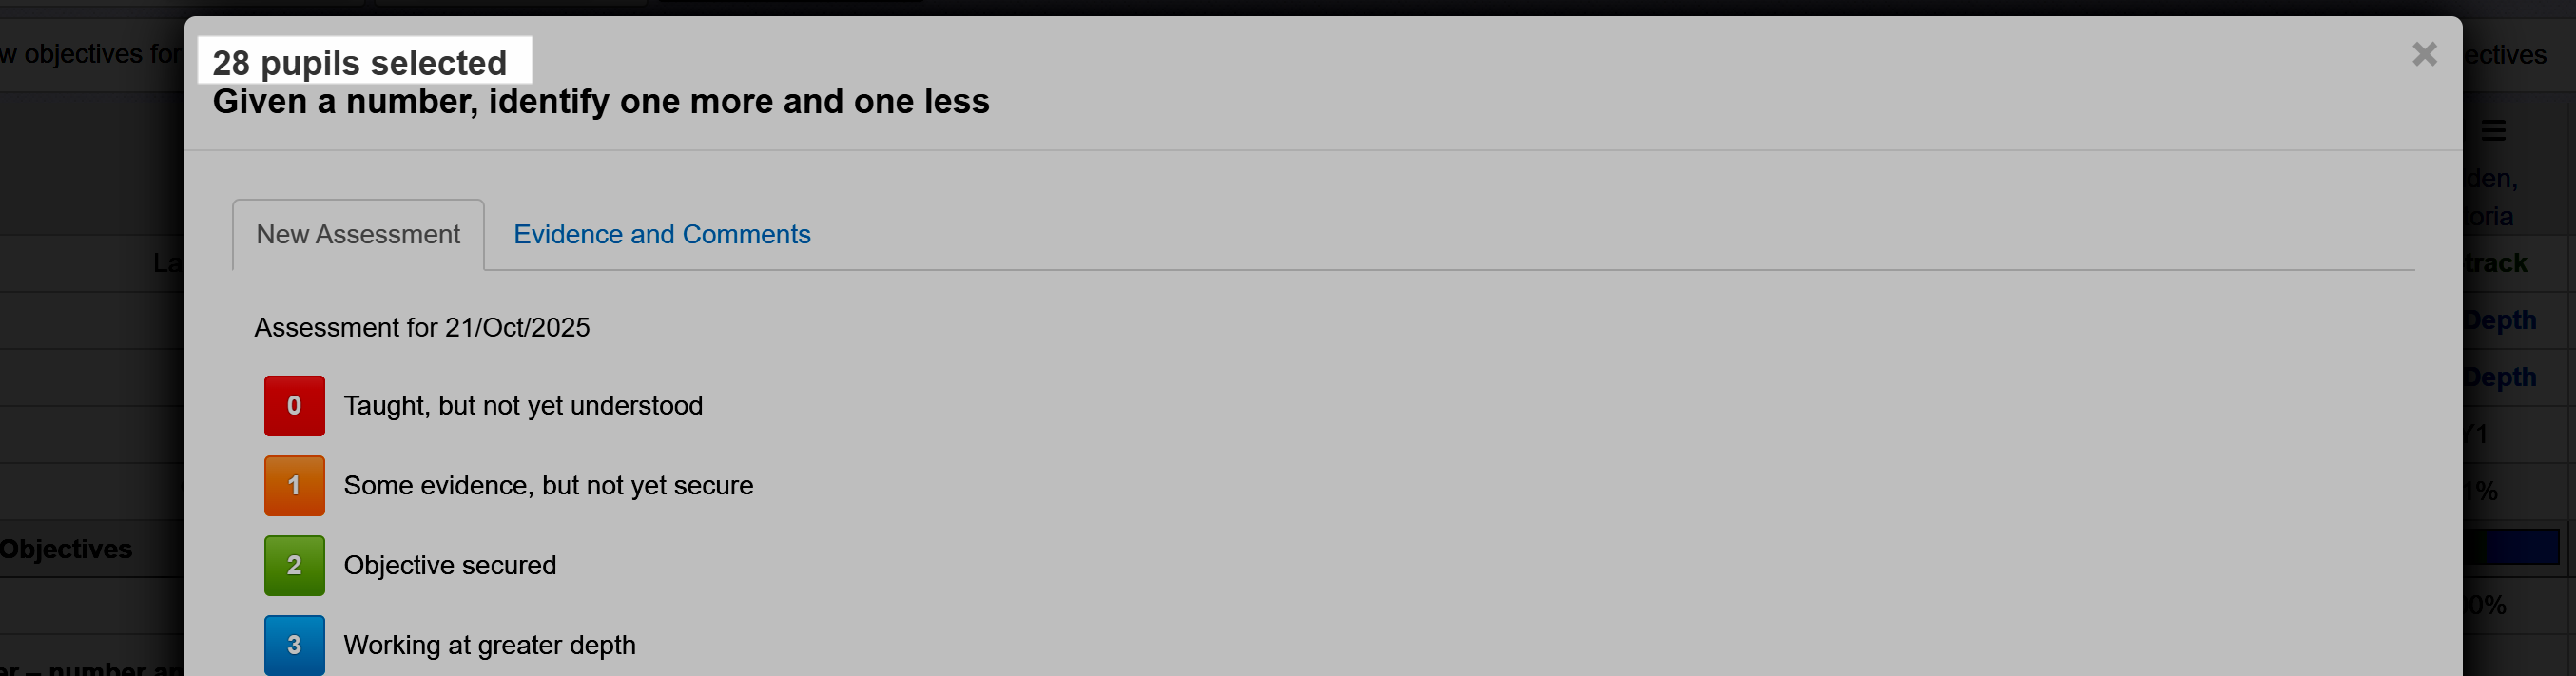
Just like before, just choose the assessment, and it will be entered and saved.
You may now want to tweak a few individual assessments for pupils who are broadly similarly assessed but just differ in one or two places.
Just un-tick the objective, so Insight knows you want to work on individual assessments again, and make the required changes.
To save even more time, you can use the same approach for multiple objectives and pupils which works in just the same way.
Tick any objectives you want to assess and also tick any pupil names, to say you only want to assess the selected objectives for the selected pupils.
Then click in any of the highlighted assessment areas to display the assessment form again.
This time, the assessment form will indicate the number of pupils and the number of objectives selected.
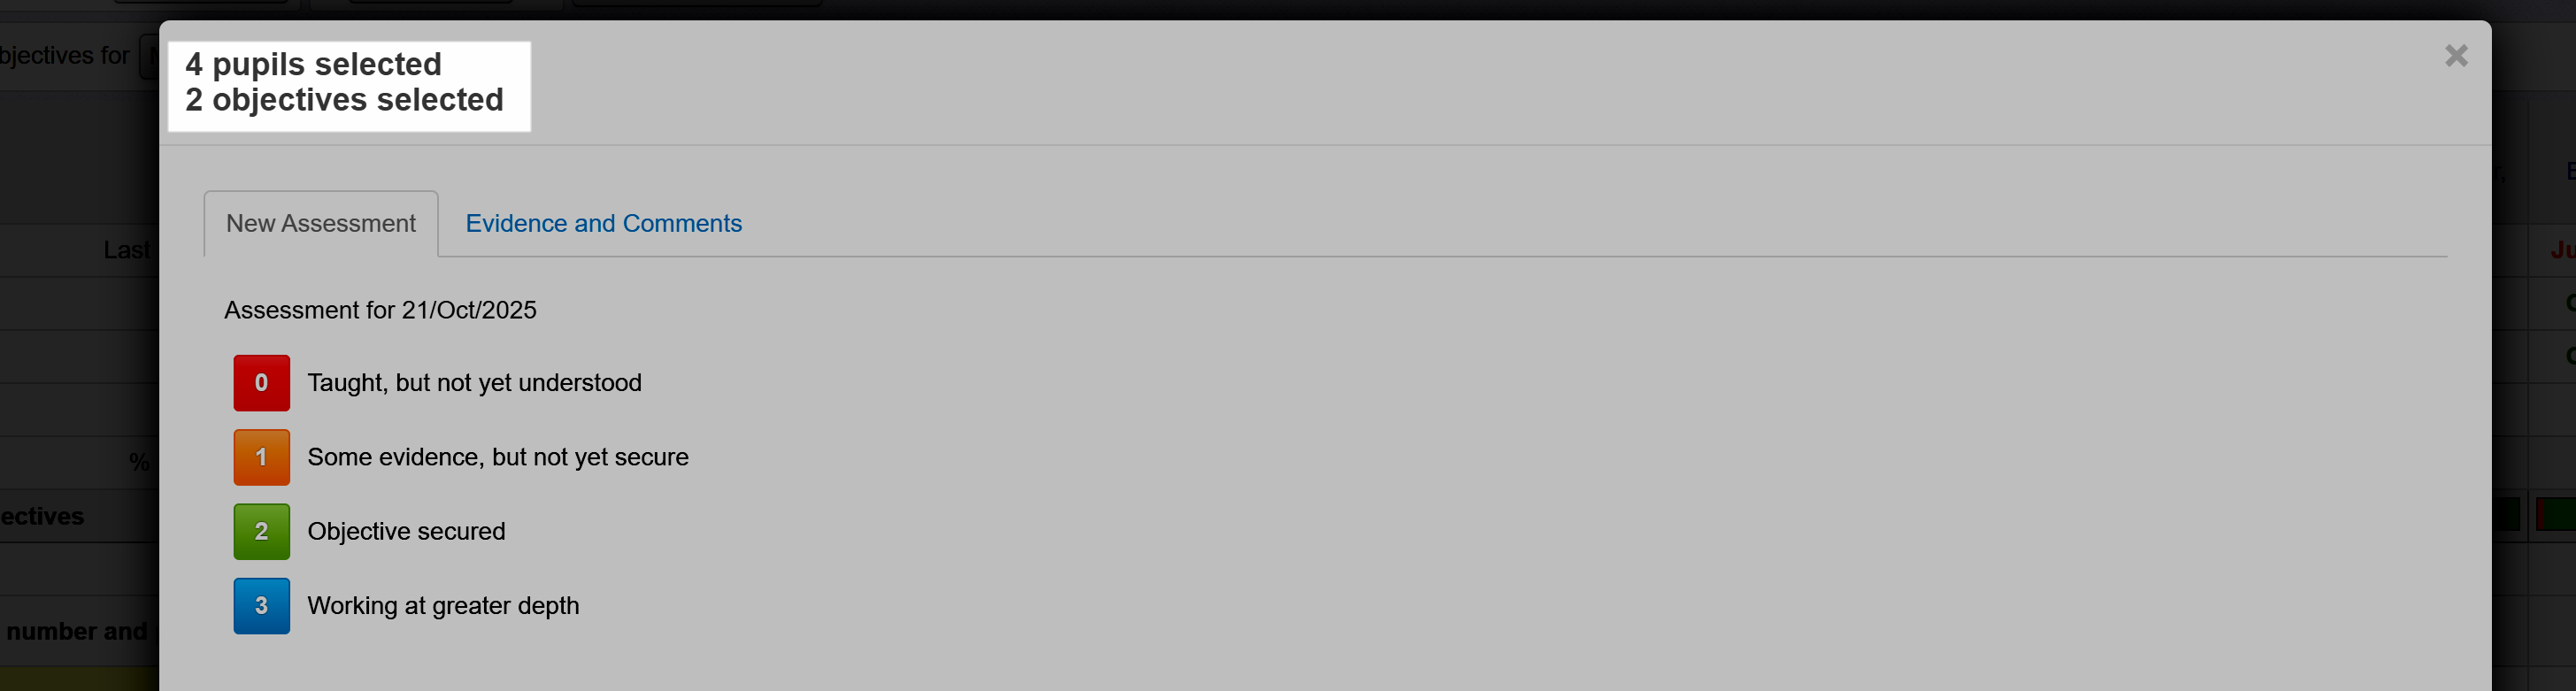
As before, just click the assessment you want, for those pupils and objectives.
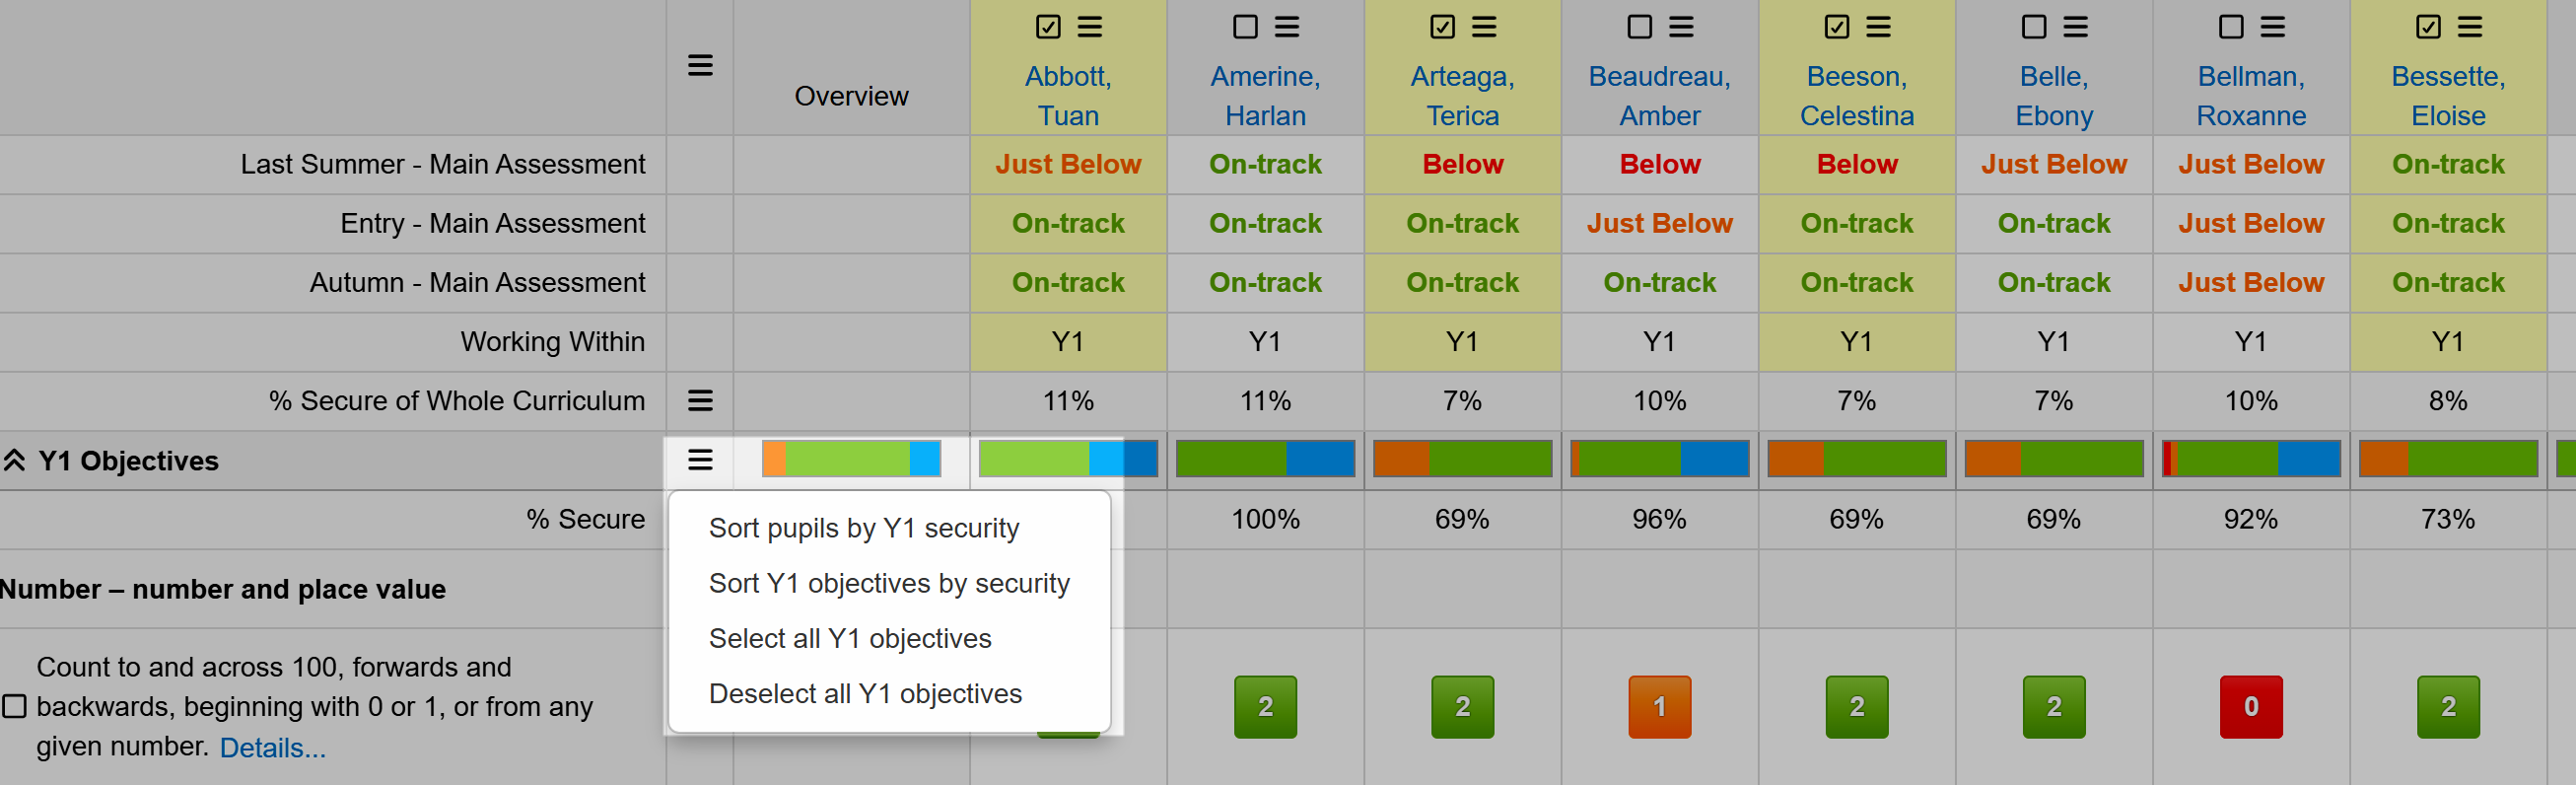
If you want to assess a few selected pupils, for all the objectives, the little Action, sometimes called a burger, menu next to the year band heading lets select all the objectives in that band.
These selection options should help reduce the time it takes to enter the objective assessment data.
Entering summative assessments directly in the Objectives grid
It can be very useful to see your formative assessments in order to inform your summative teacher assessments. Directly beneath the pupil names, I have the main teacher assessments for my school:
Just click on an assessment cell to enter an assessment. Assessments entered here are the same as those entered via the summative mark sheet so they can be added or amended in either place.
Objective analysis in the grid
Summariser rows
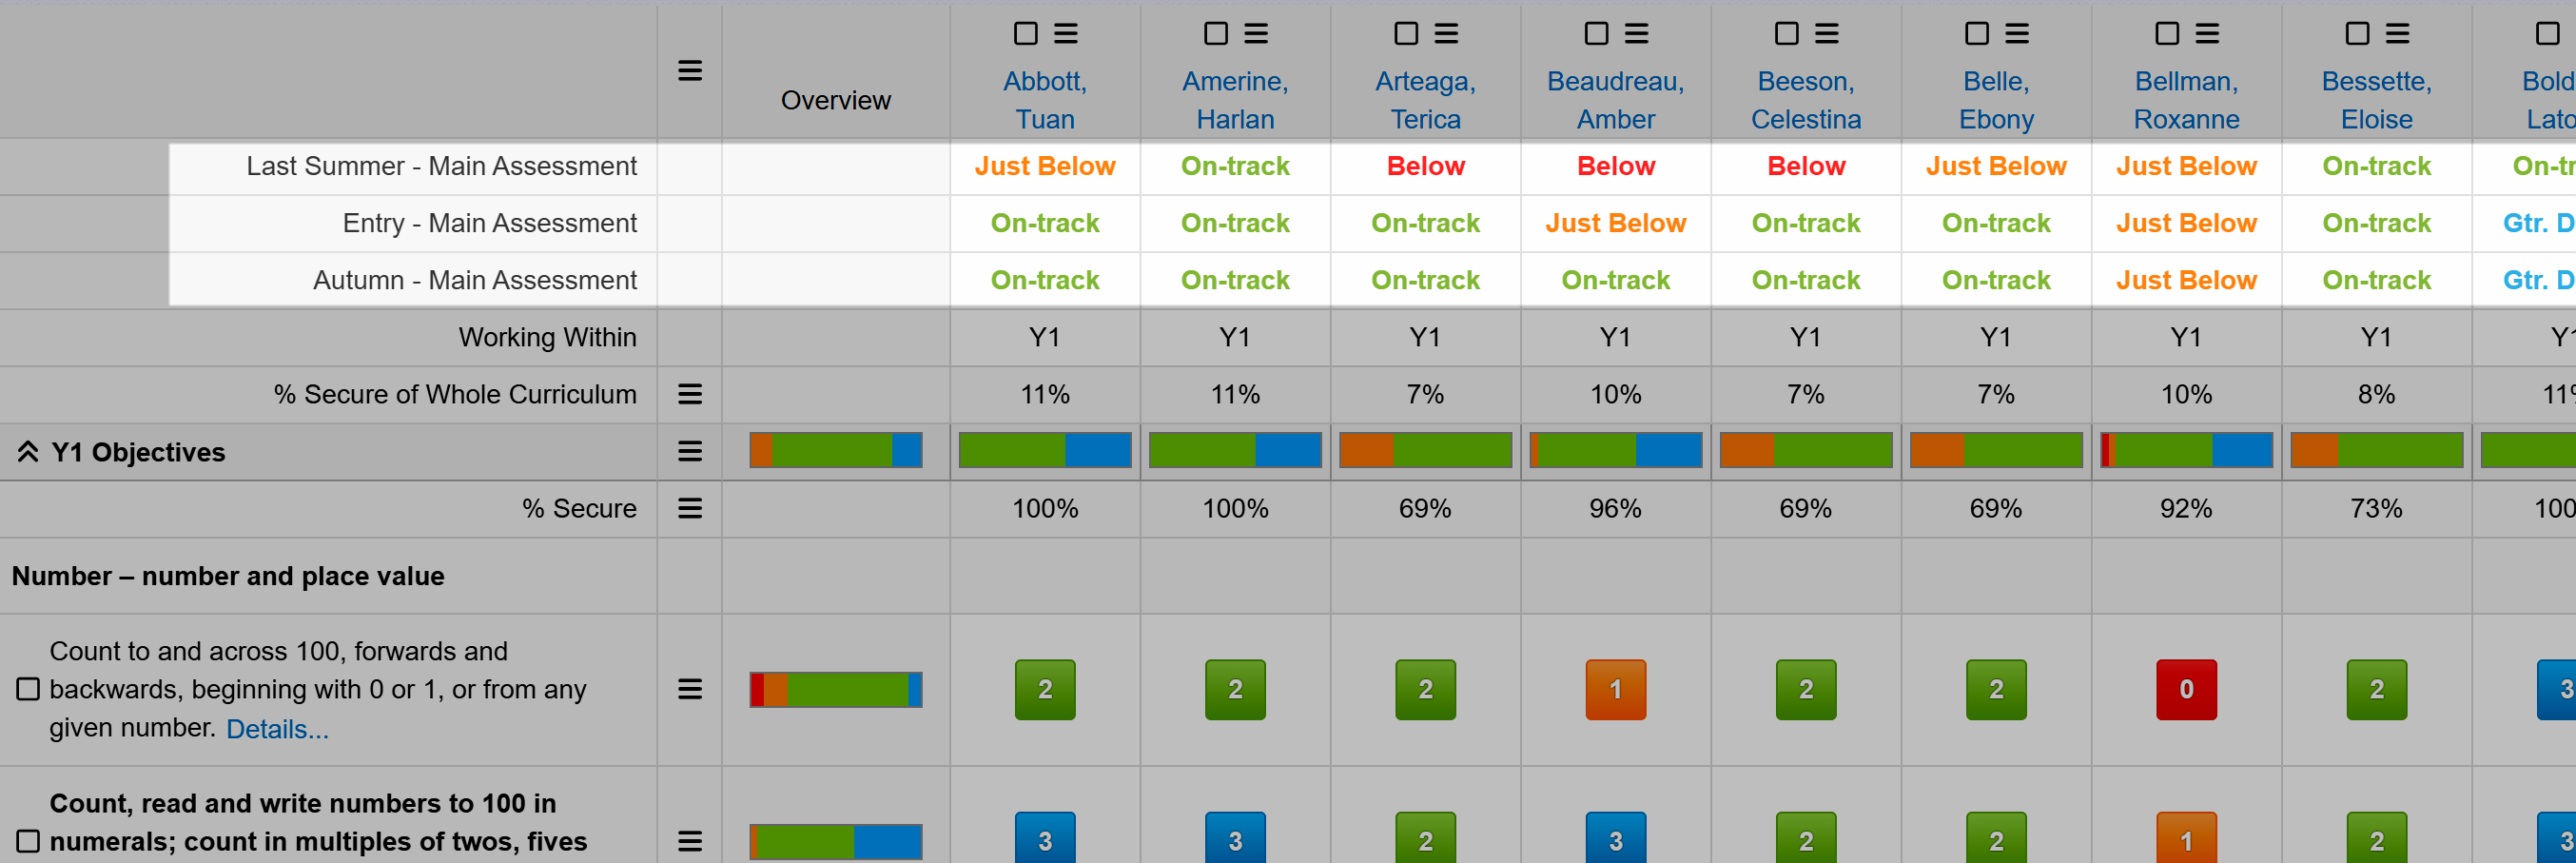
I have a "summariser row" for % Secured. This shows the percentage of objectives that have been assessed as secured.
There are other options for the data displayed in these rows, so just get in touch if you want to discuss how to perfect it for your school.
Working Within
You may have a Working Within row displayed:
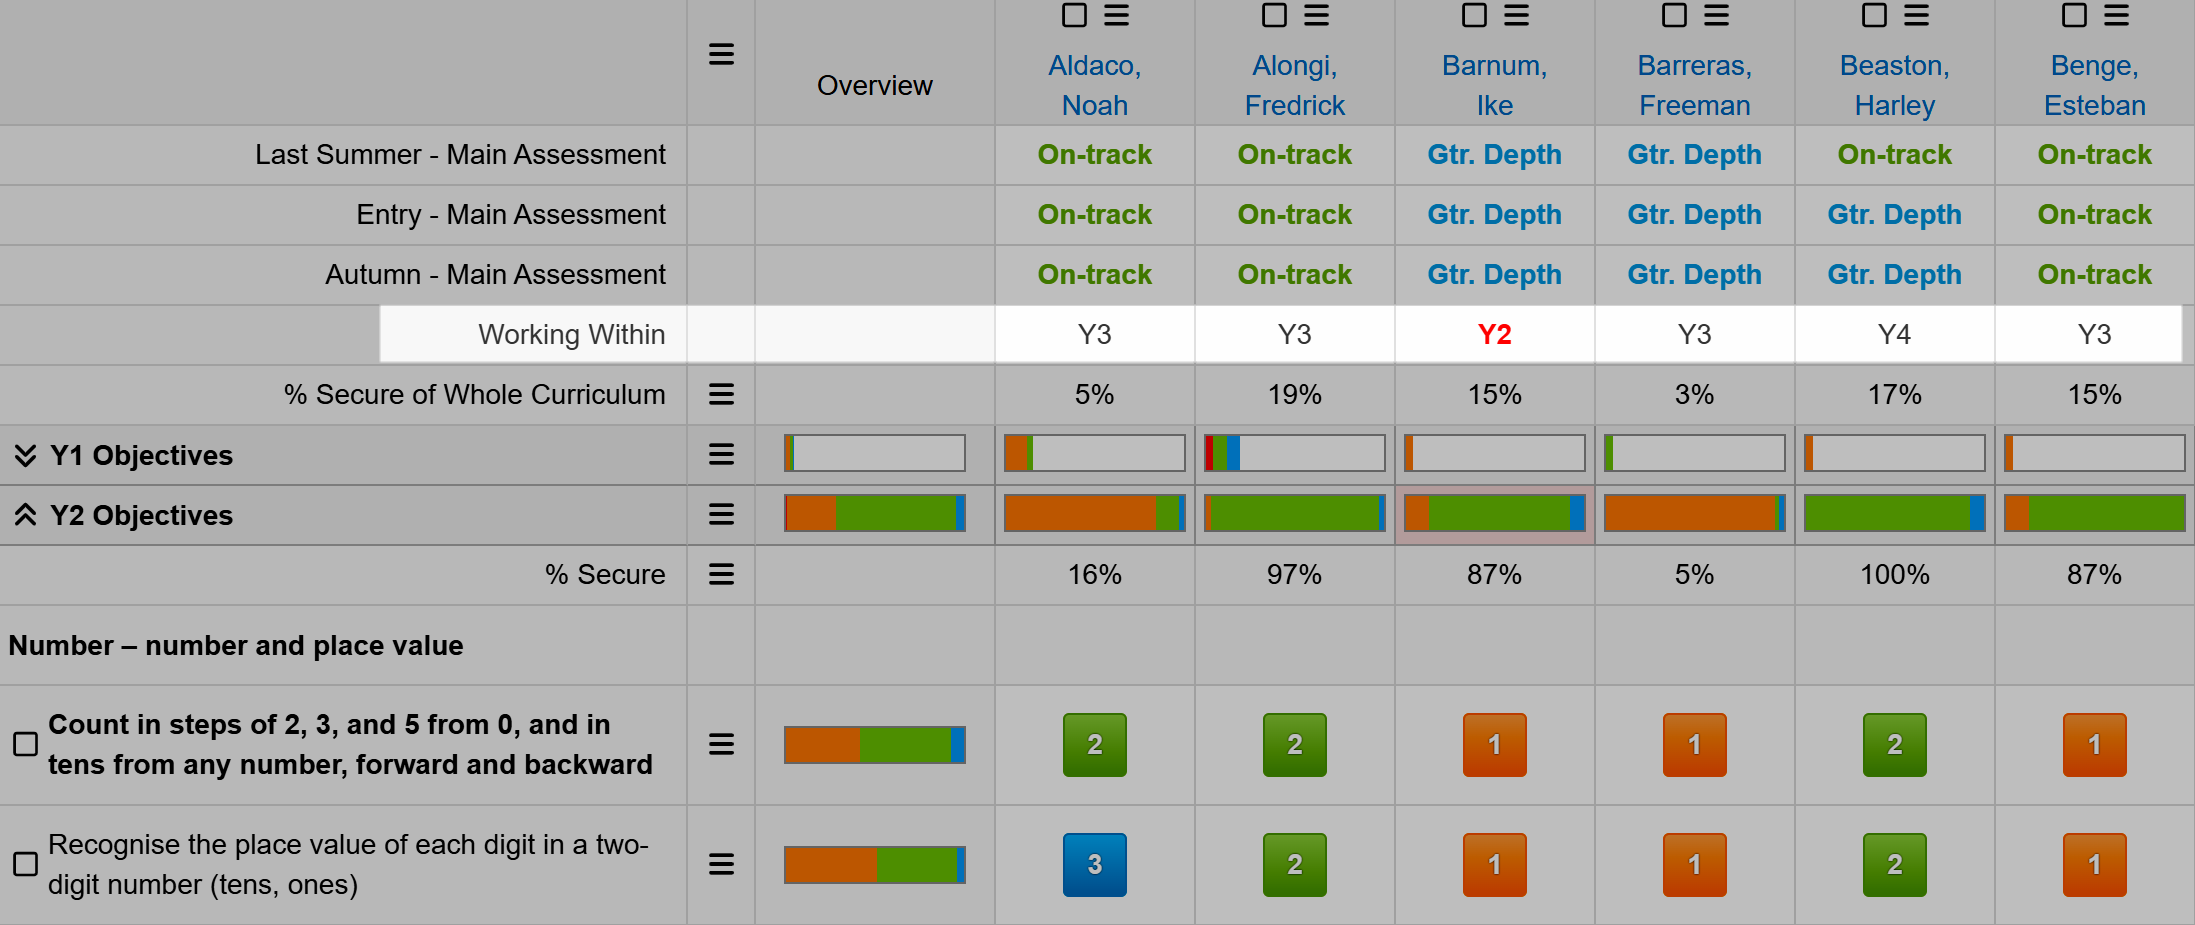
Working Within refers to the objective period / year band a pupil is currently assessed against. Usually It's determined automatically by the system based on the latest dated assessment for each pupil.
For example, a pupil might be "Working Within" Year 4 objectives based on their most recent assessments.
If needed, you can manually override this by clicking on a pupil's specific "Working Within" entry in the objectives grid and editing it directly.
If a pupil is working within a lower period than any associated year group the text will be red.
Attainment shaded bars
The shaded bars beneath each pupil may be a useful visual aid to validating your teacher assessments. Each is a simple proportional fill based on the number of objectives assessed at each assessment grade.
Depending on where you are in the academic year, the shading may support an assessment decision. It could also provide opportunities for challenge in pupil progress meetings, for example.
The Overview column also has a shaded bar. This indicates the proportional achievement for each objective.
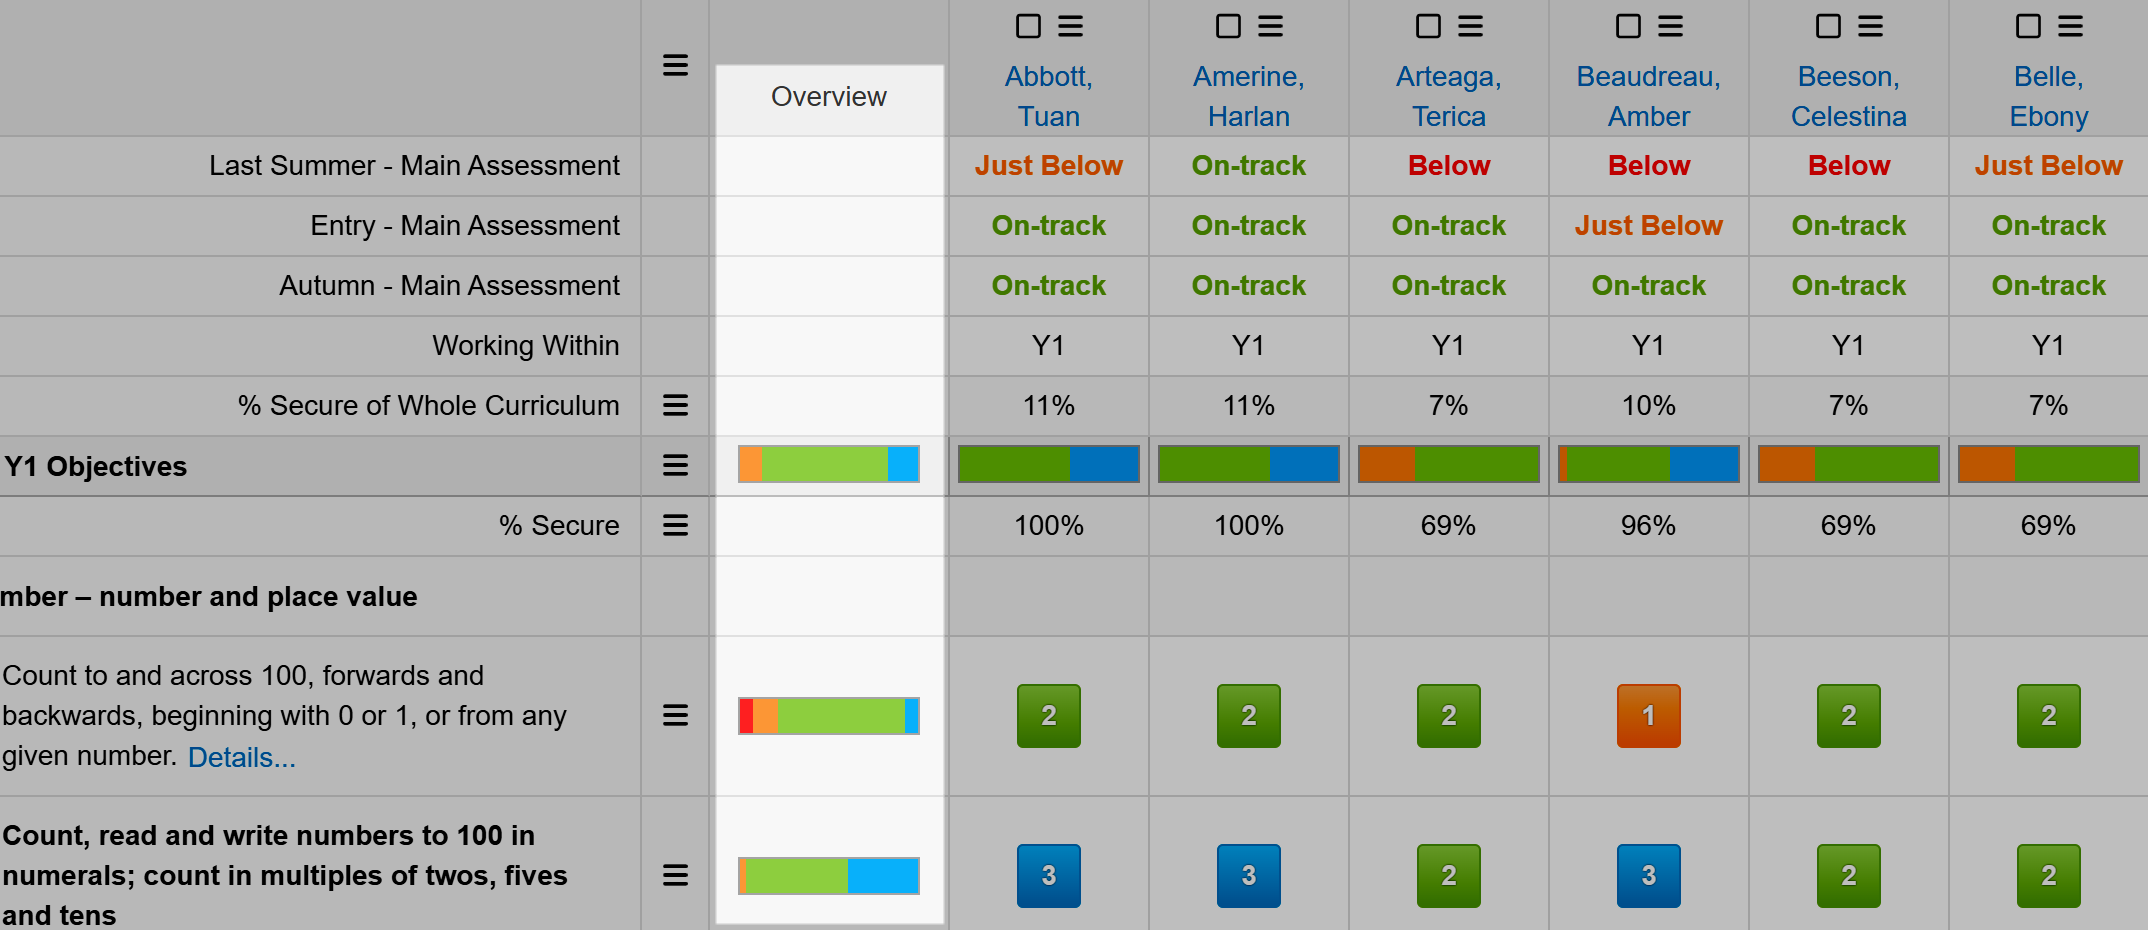
For a quick snapshot, you can click on any bar on an objective row to see the pupil names assessed at each grade.
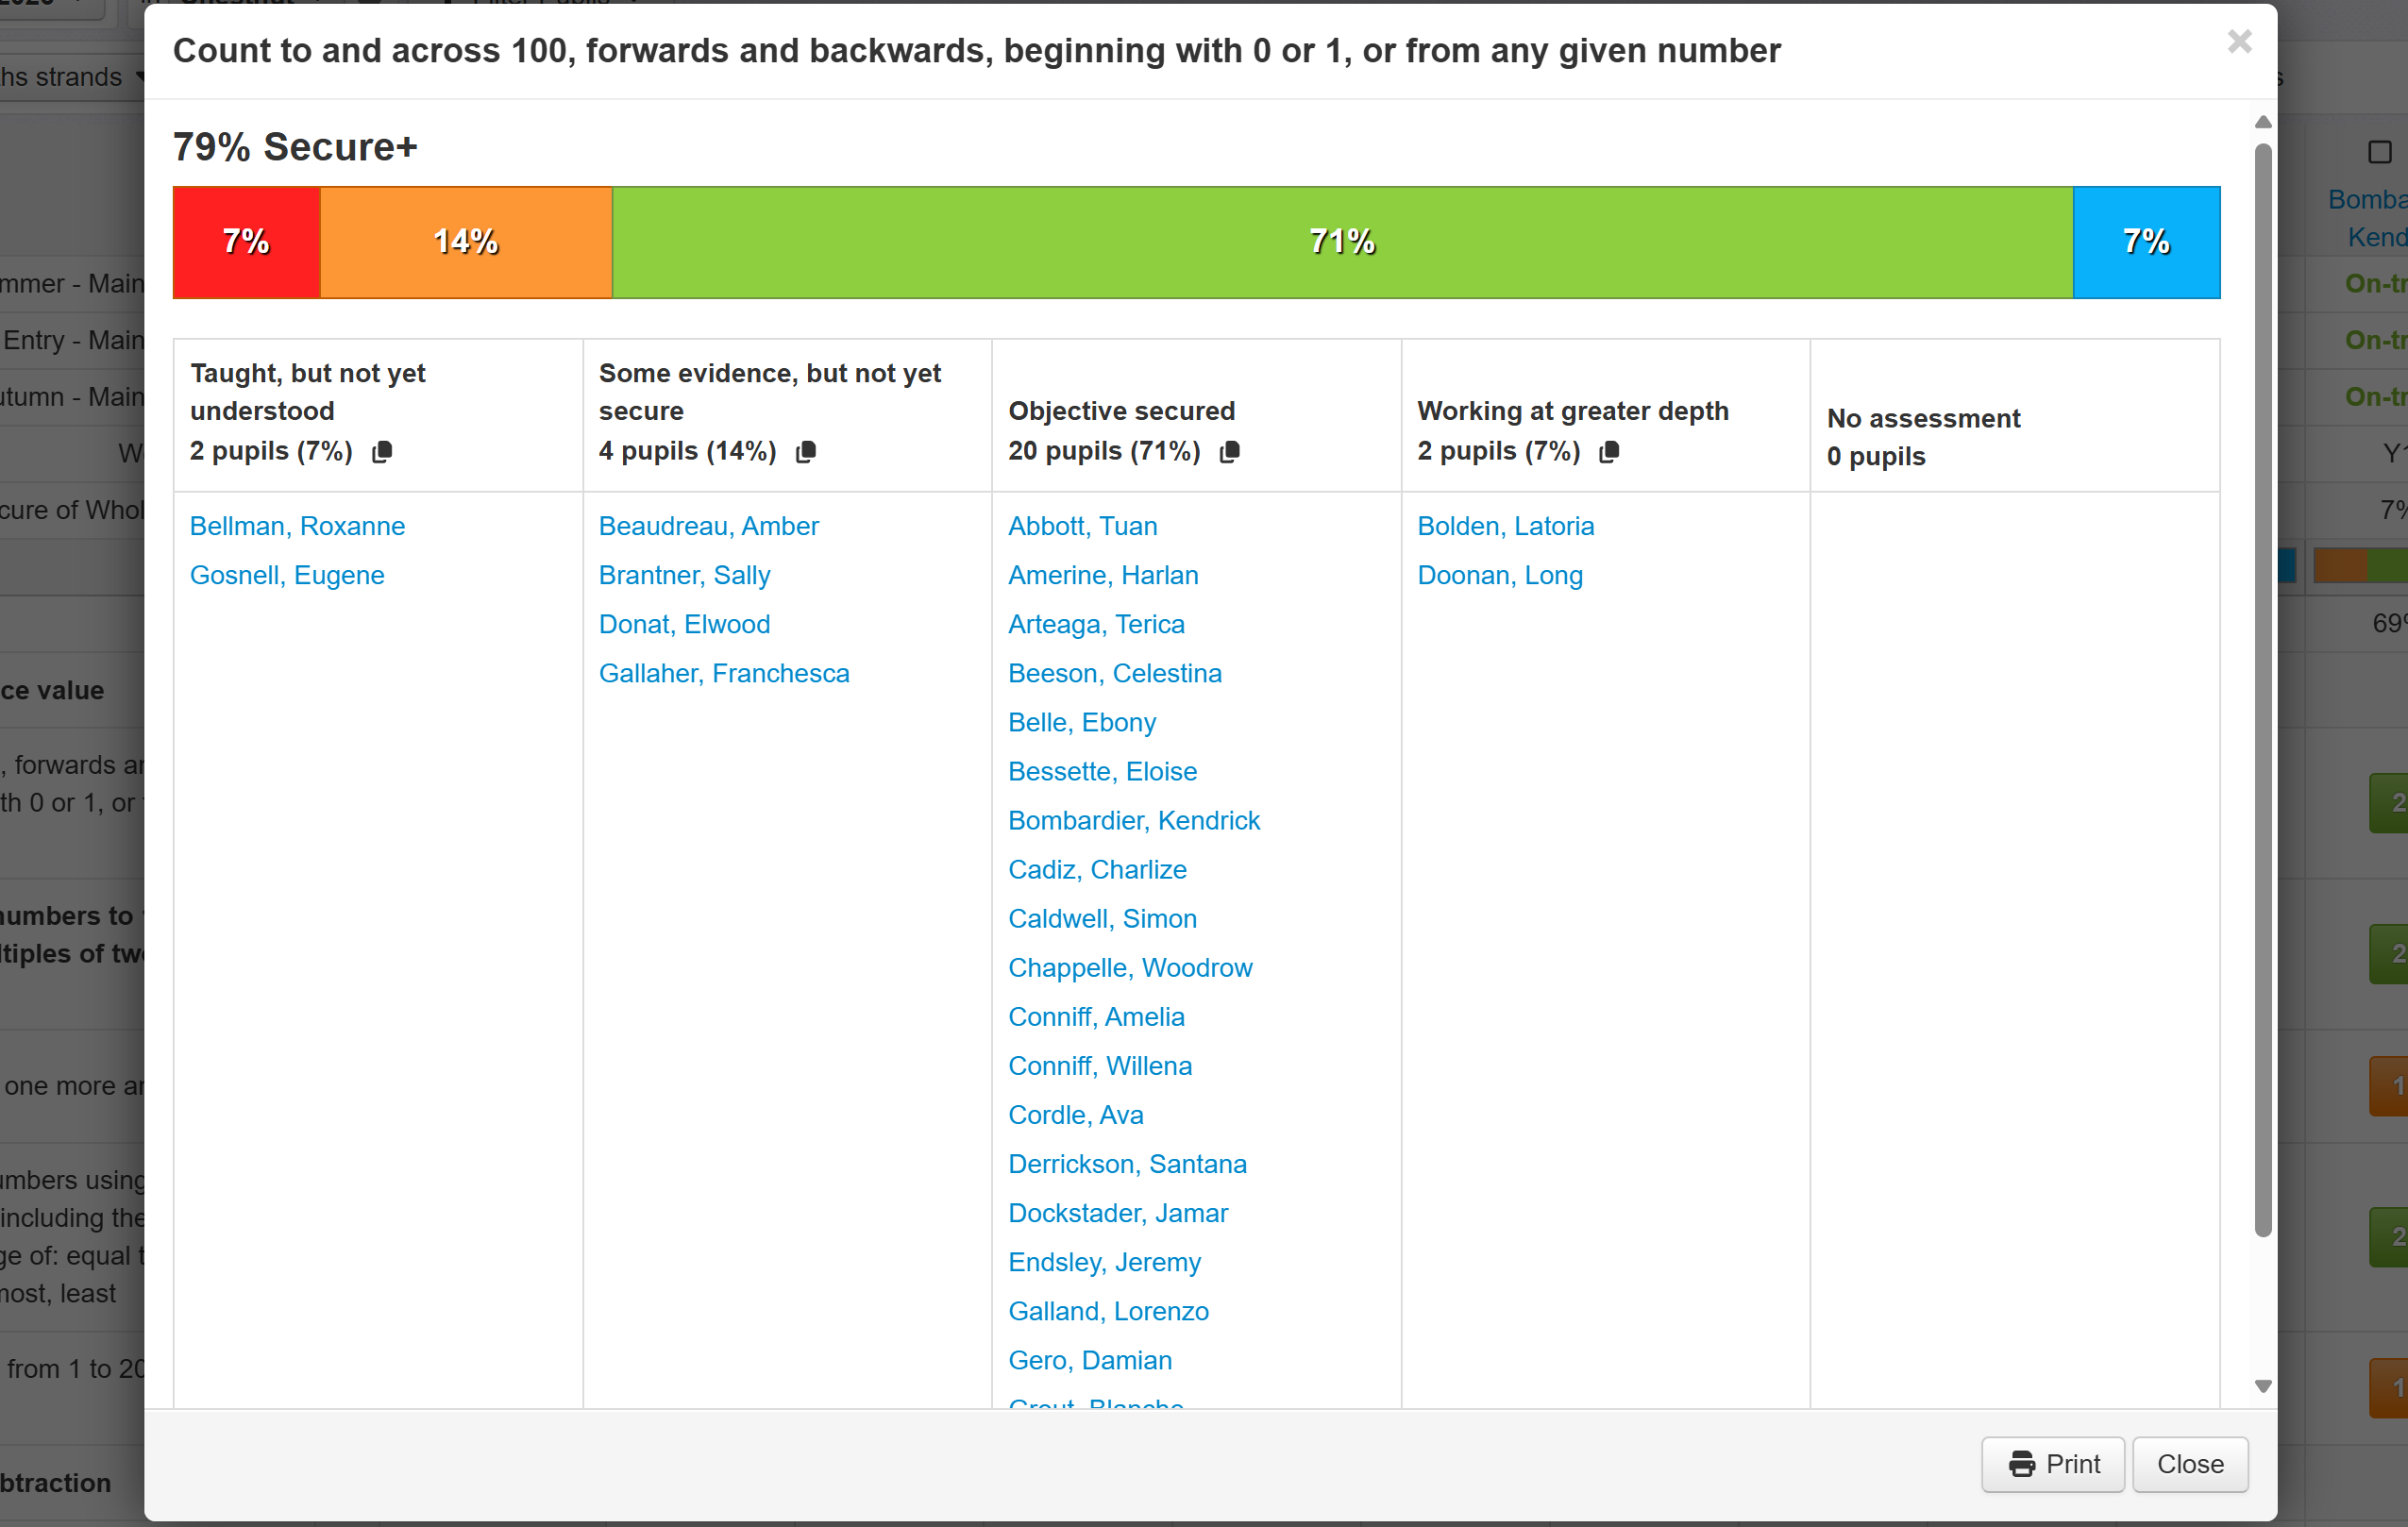
Each column has a little Copy icon. Click this to copy the names in that column. This can be helpful if you want to keep records outside of Insight, or if you want to quickly paste those names to create a pupil focus group.
The Print button also generates a useful print view which, when printed, can provide a useful record for use within lessons to inform pupil support.
Other analysis may be performed using the Tables report or via the individual pupil tabs. There are also various options for including objectives in parent reports.
Objectives Download options
It can be useful to export the Objectives assessments, for use outside of Insight. Note that if you're downloading collections from a supplier, there may be restrictions on how you can share files which contain copyrighted objective statements. Excel downloads will include a copyright notice.
Click the Download menu to see the options:

Download Excel Grid
This downloads the current view as an Excel file. The download will reflect your existing pupil filter and the year bands you have open. If you want more year bands to be included, just click the chevron button, in Insight, to open them up before downloading.
Download Pupil Reports
There are two options for downloading pupil reports. The first will include the current selected grid only. The second will include all grids, not only the one you're viewing.
A zip file will be downloaded with a separate Word file for each filtered pupil and another word file with all pupils combined.